Journal
of Non-lethal Combatives, July 2001

Air Police Control and Restraint Techniques
This online version copyright © EJMAS 2001.
Contributed by W. Stewart Bush.
Editors note: Distribution list, table of contents, and list of
illustrations omitted. The images presented are best available. Some minor
formatting changes were made, but no information was changed.
SAC Manual Number 125-2
Headquarters Strategic Air Command
Offutt Air Force Base, Nebraska
September 1958
Foreword
1. PURPOSE AND SCOPE. This manual describes the basic principles in
the application of control and restraint techniques. The application of
these principles is necessary to the development of those combative skills
essential to air police personnel in the performance of their official
duties. Corollary benefits will be the development of self-confidence and
the promotion of physical fitness.
2. BACKGROUND. The nature of air police duties is such that military
personnel engaged therein must at all times be mentally and physically
prepared to apply whatever force is necessary to accomplish their mission.
The air policemans training dictates that he first resort to all means
short
of the use of force to control any situation. There will occur certain
circumstances under which the use of force is unavoidable. The ability
to act effectively will quickly terminate such encounters in favor of the
air policeman with little or no injury to the offender. This manual is
intended to provide further refinements to basic training in air police
control and restraint techniques, and to develop and instill confidence
within the air policeman in his ability to cope with such situations.
FOR THE COMMANDER IN CHIEF:
-
BYRON K. ENYART
Colonel, USAF
Director of Administrative Services
This manual contains no copyright material.
This directive pertains to all SAC bases.
Section I. General
1. PURPOSE. This manual prescribes the basic maneuvers and application
of control and restraint techniques so as to impart such essential combative
skills (Judo) as are required of air police in the performance of their
official duties, to develop self-confidence, and to promote physical conditioning.
2. OBJECTIVE. The objectives are:
-
To insure the ability of the air police to tactfully and skillfully cope
with situations which require the use of force in the control and/or restraint
of personnel.
-
To integrate combative training with modern control procedures, teaching
the principles of restraint so as to prevent the use of unnecessary force
in the handling of military personnel and/or prisoners.
3. RESPONSIBILITY. The base provost marshal will monitor and supervise
this training in accordance with SACR 50-9.
Section II. Fundamental Principles
4. FUNDAMENTAL PRINCIPLES. There are a number of fundamentals in combatives
measures skills. Some must be observed at all times; and others are used
in special situations. Where one begins and the other leaves off is difficult
to define and can only be determined by the user. Often the application
is separated only by a split second. The essential principles basic to
effective combative measures and restraint application are:
-
Relaxation the keeping of mental or physical tension at a minimum by
"giving way" to resistance. This practice tends to increase self-control
and adaptability in combative measures performance.
-
Psychological time creating the element of surprise by temporarily distracting
the adversarys attention through subtle psychological or physical means
for preparation of attack, counterattack, or control.
-
Leverage grasping the clothing and applying the fulcrum-lever principle
against the adversarys weaker muscles, joints, or off-balance positions
serves as a means of leverage in the control or handling of individuals.
-
Footwork correct shifting of the feet insures both balance and strong
counterattacking positions. Crossing the legs must be avoided. The effective
control of the adversary is dependent upon proper footwork.
-
Physical timing the principle of physical timing is to attack at the
split second when weight, momentum, and strength are gathered for use against
itself.
5. BALANCE. Mental balance, or stability, is a state of mind that is necessary
before physical balance can be achieved. Physical balance must be retained
by the air policeman and destroyed in his adversary. The destruction of
the adversarys body balance, after he has been led by a finesse or subtle
movement into an off-balance position, is a fundamental of Judo technique.
A sudden push or pull applied to the upper parts of the body will weaken
or break body balance and serve to nullify the adversarys strength or
offensive power. Once the adversary has been place off balance, he should
not be allowed to regain it. This should be followed by immediate control
or restraint.
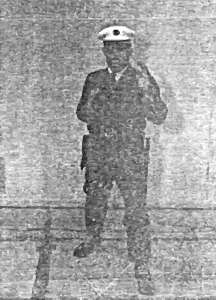
6. ON-GUARD POSITION. To get into a position which offers fighting maneuverability
for offense, defense, or control, the feet are placed apart about the distance
of the width or the shoulders, palms are open, posture is erect, and knees
are slightly bent. (Figure 1.) In this position, the air policeman can
move about and is in a state of readiness to meet the adversary according
to the action or type of control that might be required to terminate the
situation. Positions of movement as indicated in figures 2, 3, 4, and 5
may also be applied from the on-guard position.
7. AVOIDING THE ADVERSARYS ATTACK. Avoid working against or stopping
momentum initiated by the attacker; use it and/or redirect its force to
defeat it through its own action. For example, if the adversary attacks
with a wild blow, quickly avoid the impetus of the blow, parry, and let
his momentum take him off balance; immediately apply follow-up restraint.
Usually unskilled individuals will use wild swinging type blows, and many
times they will pick up implements that may serve as a weapon for attack.
Such blows may be avoided and parried outward or inward with the edges
of the hands and forearms. (Figures 2, 3, 4, and 5.) The impetus of a missed
blow will also create for the air policeman an opportunity to apply any
one of the restraints or come-alongs outlined in section IV.
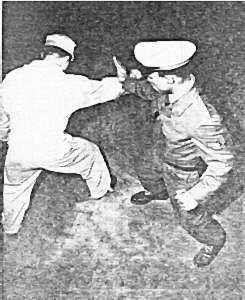
Figure 2. Left sidestep outside parry
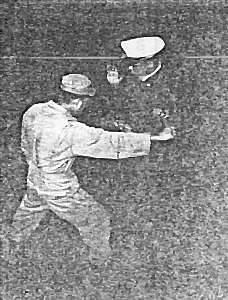
Figure 3. Right sidestep inside parry
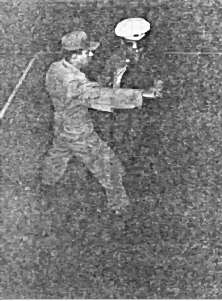
Figure 4. Right inside pivot and parry

Figure 5. Left outside pivot and parry
8. STRIKING TECHNIQUES.
-
If striking is necessary, striking techniques must be used only to the
extent necessary to effectively control a physical problem situation. All
striking techniques should be executed with caution and control. The more
serious types of blows should never be administered unless a life is endangered.
-
The immediate objective in any offensive or defensive encounter is to control
the adversary as quickly as possible, and if it becomes necessary to administer
some type of striking technique, it should be executed with lightning action
and accuracy. In executing these techniques, one should always bear in
mind the following points:
-
The bone edges of the limbs can be used as a means of attacking the sensitive
nerve plexuses or soft areas of the body, either from far range or ground
positions in which self-defense may be involved.
-
Striking techniques directed to muscle areas or across bone areas are effective
in diverting the attacker from any mode of attack. An element of surprise
is effected when this technique is applied. It is recommended only against
an antagonist who is difficult to control.
-
Blows directed to any of the vital areas are the most serious and effective
toward "knocking out" the antagonist. These areas are located at the base
of the occipital mastoid process, nasion, point of chin, thyroid cartilage,
carotid artery, and testicles.
-
Blows delivered to attackers midsection cause a sickening feeling and
are very disconcerting. Digging or pressure action by use of the knuckles
and finger points may be effectively used to produce shock against nerve
areas and gain control of the antagonist.
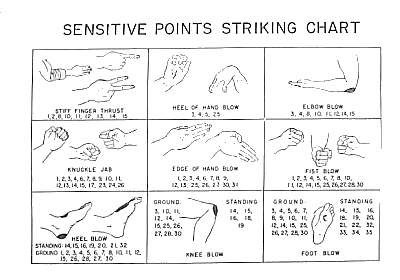
Figure 6. Sensitive points striking chart (striking surfaces)
-
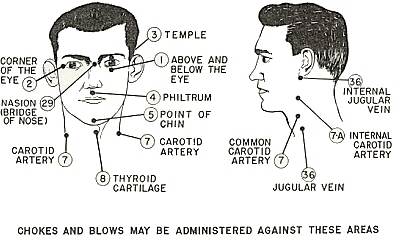
Figure 7. Sensitive points chart (head and neck)
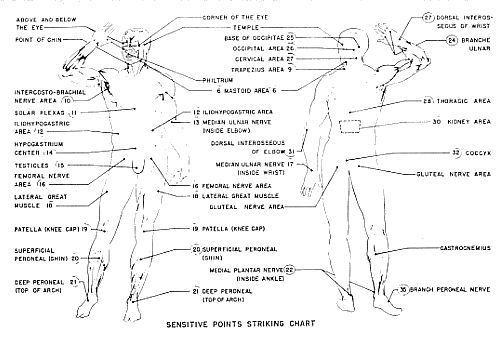
Figure 8. Sensitive points chart (body)
Section III. Control and Restraint Methods
9. GENERAL.
-
Once a person has been apprehended or subdued, the air policeman must "take
him in" in order to complete the arrest. If he is drunk, unruly, or potentially
dangerous, he must be kept helpless. Applying proper restraint or come-along
makes the prisoner amenable to movement or to other actions by the air
policeman. A come-along or other type of restraint is often used in preparation
for handcuffing or additional mechanical means of control.
-
No come-along or restraint applied without mechanical means has been developed
that can be maintained successfully over a long period of time against
a prisoner who is in full possession of his faculties and who is determined
to break it. It is true that some escapes from come-alongs may be made
at the expense of broken bones or painful dislocations. If the adversary
is desperate enough, this will not deter him. If the come-along or restraint
must be maintained over considerable distance, or for a considerable length
of time, it is advisable to apply handcuffs or other mechanical means or
keep the prisoner under definite control through continuous use of leverage
or follow-up extreme methods if necessary.
-
Control or restraint techniques in this guide are based on the following
approaches:
-
Psychological approach. This may consist of reasoning with the individual.
All too often an antagonistic approach merely aggravates the situation
and leads to the use of force which might otherwise have been prevented.
Application of common sense, a courteous but firm manner, and basic leadership
principles are essential to the initial approach to any situation. The
position of interrogation, as shown in figure 9, is the basic position
for all maneuvers. From this position, the interrogator is so situated
as to apply any of the come-along and/or restraint holds.
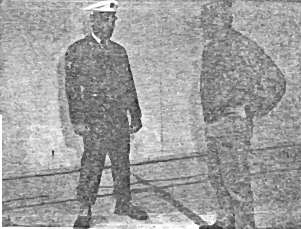
Figure 9. Position of interrogation
-
Physical approach. When all psychological approaches to handling individuals
have been exhausted and it becomes necessary to resort to the use of force,
restraining techniques should be applied in the manner that best suits
the situation.
-
Mild application. This consists of utilizing a light grasp of the individuals
sleeve with the hand and guiding him in the direction desired. From this
position, the air policeman will be prepared to prevent or control any
increased resistance initiated by the individual. (Figure 10.)
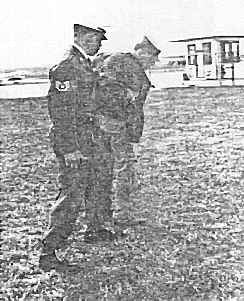
Figure 10. Mild application
-
Medium application. This consists of progression from mild application
to more vigorous techniques when the individual is strong and aggressive.
The degree of control to be applied falls short of full application of
severe leverage or other maximum force. (Figure 11.)
-
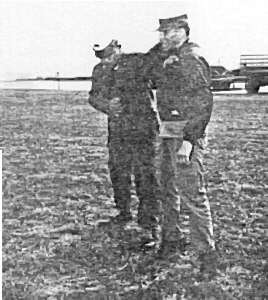
Figure 11. Medium application
-
Advanced application. This consists of throws, chokes, or application of
severe leverage when the individual is uncontrollable. It is applied when
it is necessary to immediately terminate any situation which may involve
a struggle. It is used in extreme cases when the individual is dangerous
and when self-defense is an absolute necessity. (Figure 12.)
-
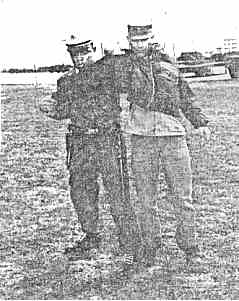
Figure 12. Advanced application
-
In applying restraint or come-along methods, initial control of the adversary
is effected by grasping his clothing with concentration directed toward
use of resistance or use of extension or flexed arm movement. For example,
if the adversarys arm is in the extended position, leverage should be
applied to his elbow. (Figure 13.)
-
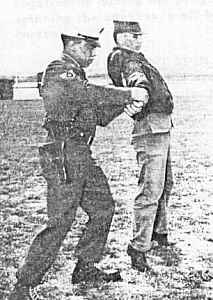
Figure 13. Elbow leverage
-
If resistance is offered to this application, and the adversarys arm or
wrist is in a flexed position (Figure 14), leverage would be logically
applied to either the wrist or shoulder. (Figures 24, 25, 27, 28, and 29.)
-
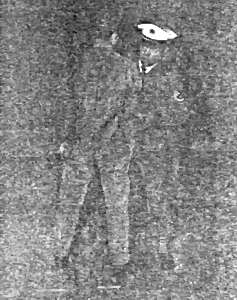
Figure 14. Example position of resistance
Section IV. Maneuvers and Restraint
10. CONTROL. When direct or immediate control is necessary from the
position of interrogation or during the progress of any close contact situation,
it may be secured by dragging or spinning the adversary off balance to
create an opening or definite application of restraint or control.
11. TWO-POINT SPIN AND CONTROL. This method may be taken by swiftly
pinioning the adversarys arms to his sides with a simultaneous clockwise
or counter-clockwise movement of his body. (Figures 15 and 16.) Progression
into the most suitable restraint may be applied as indicated in figures
10, 17, 18, 19, 20, 31, and 32.
Figure 15. Two-point spin and control

Figure 16. Two-point spin and control
12. SHOULDER DRAG. If the adversary resists the two-point control or
any of the initial control or restraint leverages, the shoulder drag may
be executed by twisting the adversarys shoulder diagonally to his footing.
(Figure 17.) At this point, immediate application of cross-shoulder control
or half choke (figures 18 and 19) may be effected.
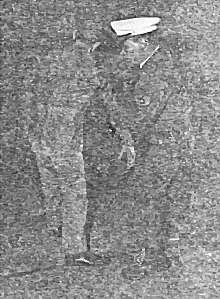
Figure 17. Shoulder drag
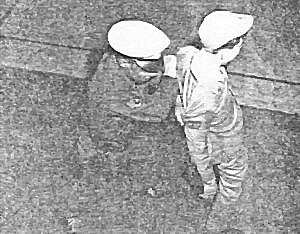
Figure 18. Cross-shoulder control

Figure 19. Half choke
13. FRONT ARM DRAG. The front arm drag is an advanced method which can
be applied in maneuvering the adversary off balance and may be used in
various close contact positions or from counter-offensive ground positions.
It is an effective method when direct action is required. It may be secured
by reaching forward with the right hand and grasping under the adversarys
arm at his triceps point. The drag is swiftly initiated by pulling him
directly forward. (Figure 20.) From this point, controls illustrated in
figures 18, 19, 31, and 32 may be applied. If necessary, blows or advance
throwing techniques can also be applied in the process of the arm drag.
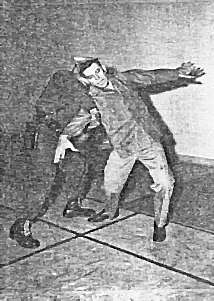
Figure 20. Front arm drag
14. CHECK BEHIND. If advance checking of the adversarys movement or
resistance is required, he may be controlled by quickly destroying his
footing and thrusting the arm across his lower jaw. (Figure 21.) This movement
will force him off balance and backwards to the ground where further control
or restraint may be applied. (Reference figures 33 and 34.) The check-behind
method may also be applied as a counter to variable rear or frontal attack
situations.
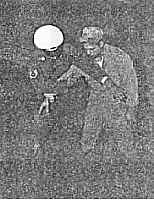
Figure 21. Check behind
15. FULL HAMMERLOCK. When the adversary checks the initial sleeve leverage
by throwing his arm over the air policemans grasping hand (figure 22),
the follow-up is made by immediately grasping the adversarys elbow with
the other hand and applying leverage to the elbow and shoulder (figure
23). Simultaneously, pivot and wrap his arm into a twisting position above
his back (figure 24) and increase leverage on the elbow and shoulder by
throwing the hip in front of the adversarys elbow (figure 25). Use the
free hand for further control of the adversary by either grasping the top
forelock of his hair or the back of his collar. This method is considered
extreme leverage and may be adapted to various attack situations where
cautious control of the adversary may be required.
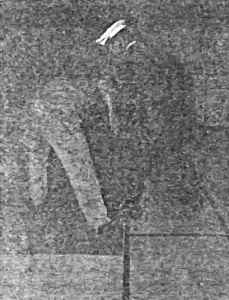
Figure 22. Full hammerlock (step 1)
-
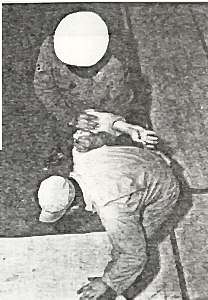
Figure 23. Full hammerlock (step 2)
-
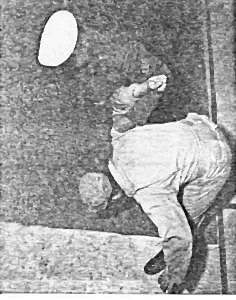
Figure 24. Full hammerlock (step 3)
-
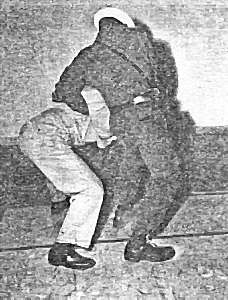
Figure 25. Full hammerlock (step 4)
16. FOREARM-ELBOW LOCK COME-ALONG. This is another come-along with a
great deal of merit. Properly applied, it makes a hold strong enough to
escort a prisoner a short distance. If pressure is maintained on the forearm,
you have complete control of your opponent. The air policeman takes an
overhand grasp of his adversarys inside wrist with his right hand; he
stretches the arm in front of him and simultaneously releases his left
hand grasp of the sleeve or elbow; he advances his left hand under the
right shoulder to the front of the chest and applies leverage to the secured
arm across the forearm or chest. (Figure 26.) Further progression may be
applied as indicated in figures 14, 29, 30, 31, and 32.
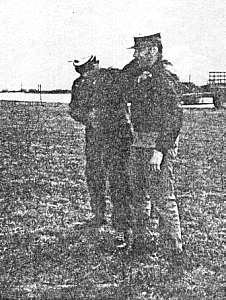
Figure 26. Forearm-elbow lock come-along
17. WRIST COME-ALONG. As mentioned before, the application of leverage
depends upon the adversarys movement and resistance. If he flexes his
arm, the logical application of control is the wrist leverage series indicated
in figures 27, 28, and 29. The following technique is the most effective
of all come-alongs, especially when you are forced to walk a man a long
distance and keep him under control. This position is maintained by twisting
his hand and wrist toward you at any sign of rebellion. By applying slight
pressure on the wrist, you can raise your victim up on his toes and, by
this means, you will know that he is completely under your control. This
come-along has the advantage of allowing you, in most cases, to maintain
sufficient pressure with one hand while you walk along with a weapon in
your right hand. This application can be reversed for the purpose of leaving
your left hand free. The wrist come-along may be applied from any of the
positions shown in figures 11, 12, 13, 14, 20, and 26.
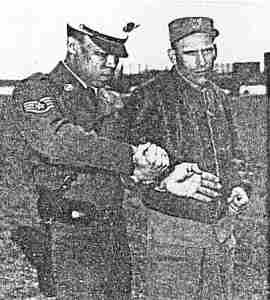
Figure 27. Wrist come-along (step 1)
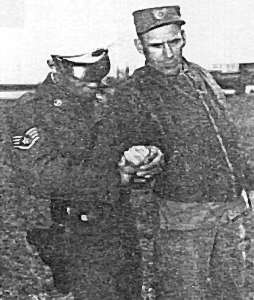
Figure 28. Wrist come-along (step 2)
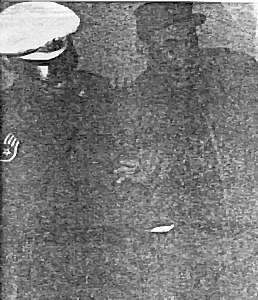
Figure 29. Wrist come-along (step 3)
18. REVERSE FOREARM-ELBOW LOCK. If the adversarys arm is in an extended
position, reach across and grab his right wrist with your right hand, raising
it about waist high. Move over to his right and slip your left arm over
his forearm and under his right elbow, at a point just above the elbow.
In this position, the sharp bone of your left forearm can be used to lift
upward against the elbow, while the right hand can press down. To make
the hold more secure, grip the coat or lapel with your left hand once the
arm is in place. (Figure 30.) Further progression may be applied as shown
in figures 17, 18, 19, 20, 21, 24, 25, 31, and 32.
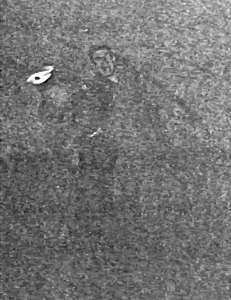
Figure 30. Reverse forearm-elbow lock
19. WHEELBARROW CROTCH LIFT. From the initial sleeve guide position,
the air policeman quickly reaches over with his right hand and grasps the
adversarys right wrist; he stretches the arm with a whip-like motion and
breaks the adversarys balance forward (figure 31); he draws the arm underneath
the crotch and moves to the rear (figure 32). He then advances by grasping
the right wrist with his left hand, keeping the adversary off balance by
exerting a lifting movement under the crotch. This method is applicable
in moving adversaries into vehicles, rooms, or cells. This maneuver may
be applied from positions indicated in figures 2, 3, 4, and 5.
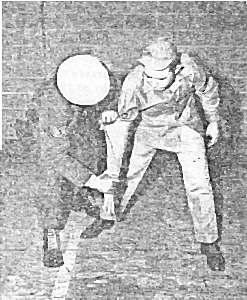
Figure 31. Wheelbarrow crotch lift (step 1)
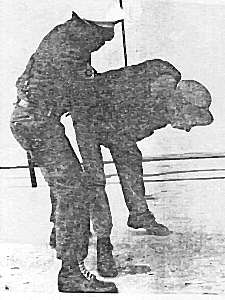
Figure 32. Wheelbarrow crotch lift (step 2)
20. REAR BELT-GRASP AND CROTCH LIFT. This method is similar to the wheelbarrow
crotch lift except that the air policeman exerts control by reaching through
with the left hand and grasping the front of the adversarys belt or pants.
Section V Controlling Your Adversary on the Ground
21. CONTROLLING YOUR ADVERSARY ON THE GROUND.
-
Whenever the adversary has fallen to the ground, it is important to maintain
control of one of his arms by pulling up on his sleeve and planting one
knee into his short ribs and the other knee into his cheekbone. Should
he continue resisting, the air policeman must be alert to immediately apply
further control. A short edge-of-the-hand blow to the opponents side,
waist, or side of the neck should terminate further resistance. Figure
33 demonstrates standard ground control method.
-
To raise an individual from the ground, apply the procedure outlined for
the forearm-elbow lock come-along. (Figure 26.)
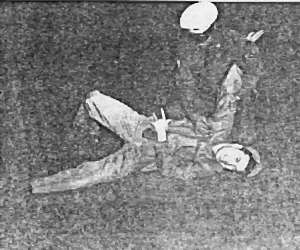
Figure 33. Controlling your adversary on the ground
-
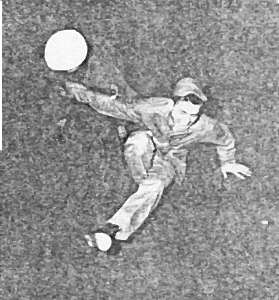
Figure 34. Raising adversary from supine position.
Section VI Breaking Up Fight, Individual Air Policeman
22. INDIVIDUAL AIR POLICEMAN. If the air policeman is handling a fight
situation, he should immediately place himself in a safe position and be
ready to apply sleeve leverage. At such time as the opportunity presents
itself, he should grasp both fighters with sleeve leverage (figure 35)
and immediately spin them apart (figure 36). Follow-ups may be applied
according to the situation.
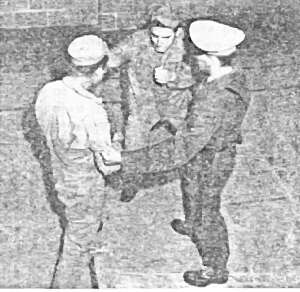
Figure 35. Breaking up fight, individual air policeman (step 1)
-
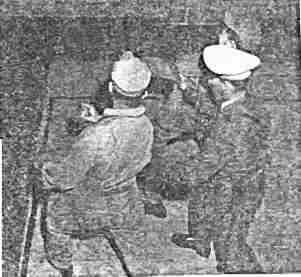
Figure 36. Breaking up fight, individual air policeman (set
2)
Section VII Air Police Teamwork
23. AIR POLICE TEAMWORK. Certain basic principles of air police teamwork
are introduced here to point out the valuable assistance a second air policeman
may render in the application of techniques previously presented in this
manual. Two air policemen can often team together to hastily control a
situation with a minimum of physical force or danger. Teamwork should be
so executed to provide elements of distraction, maneuverability, and protection.
Figure 37 shows the position of interrogation for a team of two air policemen.
The air policeman on the left uses the interrogation approach technique
and commands the individuals attention. The second air policeman approaches
from the rear and side and takes a position from which he can easily take
direct control or provide follow-up assistance to the other air policeman.
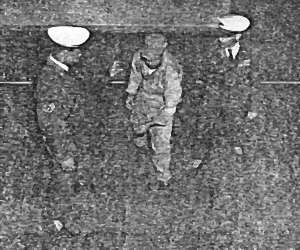
Figure 37. Air police teamwork
Section VIII Breaking Up Fights, Air Police Teams
24. BREAKING UP FIGHTS. At the instant that air policemen find one individual
attacking another, they should be alert to the possibility that the fight
is a sham in order to lure the air policemen into a serious, disadvantageous
position where they might be ganged or waylaid. In many instances, permitting
the fighters to continue their action for a few seconds will allow dissipation
of their anger and fight and will give the air policemen an opportunity
to sum up the situation before taking action. The air policemen should
apply teamwork action, step behind the fighters, and concentrate upon the
immediate control of the aggressor. The fighters are controlled by grasping
them and crashing them together head-on (figure 38). Immediate follow-up
action to the rear will throw them off balance. The air policemen then
follow up this action by applying the crotch lift, cross- shoulder grasp,
rear choke, or other appropriate method.
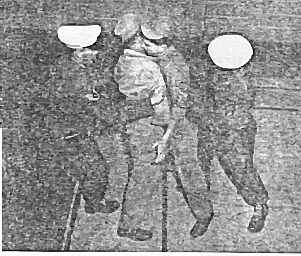
Figure 38. Breaking up fights, air police teams
Section IX Use of the Riot Stick
25. THE RIOT STICK. The riot stick in the hands of the air policeman
is an additional symbol of his authority and implies that he knows how
to use it. If he is skilled and practiced in its use, he can cope with
most situations where force is necessary. Basically, the riot stick is
an offensive weapon. How it is used depends upon the local situation. It
can be used as a club, as a jabbing or parrying instrument, or as a restraint
device. The technique of using the riot stick is described below.
26. THE GRIP. The grip is most important. Place the thong over the thumb
so that the stick will hang with the thong crossing over the back of the
hand. Turn the hand in and grasp the handle so that the thumb points parallel
to the stick. Raise the stick to a 45-degree angle, and the grip is complete.
The thong must be adjusted in length to fit the hand. When correctly adjusted,
the butt of the club should extend slightly below the edge of the hand.
(Figure 39.)
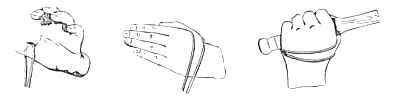
Figure 39. How to hold riot stick
27. THE BLOW. A blow delivered by the riot stick is generally effective
in the same body areas in which the edge of the hand is best used.
-
Normally, the air policeman should not use his riot stick to strike blows
about the head; this is dangerous and fatal injuries can result. Side blows
to the temple and throat area also are potentially fatal when delivered
with force. Blows delivered to the top of the head and to the forehead
are also dangerous.
-
Wild blows using the full length of the arm in the swing are not nearly
as effective as they seem; they leave the air policeman wide open for a
parry and retaliation by a trained opponent.
-
By using the riot stick as an extension of the arm in conjunction with
basic fundamental movement as indicated in figures 2, 3, 4, and 5, the
stick can be used as an effective parrying and striking instrument. A powerful
thrust with the end of the stick delivered to the solar plexus will temporarily
disable the opponent (figure 43), and short jabs to the stomach region
are effective in clearing away crowds or clearing a pathway through a mob.
-
The riot stick may also be used as a lever to apply against the wrist,
elbow, and shoulder leverage points. It is particularly useful in breaking
the adversarys balance by placing it in front of the adversarys thigh
for use as a come-along similar to the rear crotch lift indicated in figure
32.
-
Blows to the shinbone will often block an attempted kick after it has been
launched and sidestepped.
-
Well-directed blows as described below are usually as effective as head
blows, with less chance of serious injury to the recipient.
-
A man who is moving in to attack can be dropped with a downward blow to
the collar bone (figure 40); or by a shoulder shove to twist the body,
followed by a hard blow across the big muscle in the back of the thigh
(figure 41). This can be delivered with full force and results in cramping
the leg muscle so that the victim is temporarily unable to walk.
-
If the opponents arm is outstretched, a blow to the back of the hand,
on the outside of the elbow or wrist, will suffice. (Figure 42.)
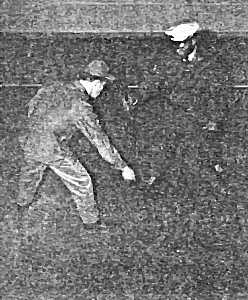
Figure 40. Blow to shoulder
-
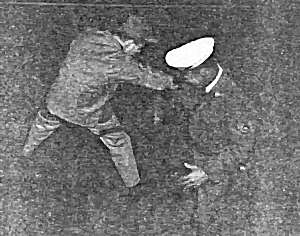
Figure 41. Blow to thigh
-
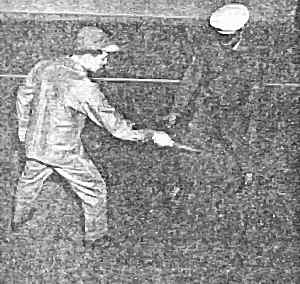
Figure 42. Blow to wrist
-
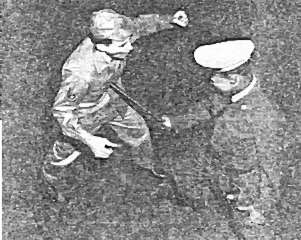
Figure 43. Jab to solar plexus
Section X Use of Handcuffs
28. HANDCUFFS. The proper use of handcuffs on various types of prisoners
requires individual practice and the exercise of good judgment. Although
the air policeman may have been told when and where to use handcuffs, he
must have training in applying them so that they perform their function
efficiently in all situations.
-
With his wrists pinioned by handcuffs, a desperate prisoner is still far
from helpless. If his hands are cuffed together in front so that the arms
swing free, it is possible for him to deliver a knockout blow using his
hands or the handcuffs themselves. When an air policeman is alone, it is
not advisable to handcuff himself to the prisoner. This leaves the prisoner
with one hand free for attack and restricts the air policeman in preventing
any attempted escape. Generally, it is much better to use the handcuffs
to pinion both the prisoners hands.
-
Since there are many methods of using handcuffs, each prisoner can be cuffed
in a manner which will prevent him attempting to escape or attacking, according
to the air policemans estimate of his dangerous potentialities. This is
particularly important if the prisoner is being moved from one locality
to another. Various methods of attaining maximum use from handcuffs are
described below.
29. INTERLOCKING CUFF. One wrist is locked and pinioned with enough room
to permit the jaw of the other cuff to be inserted between the wrist and
the locked cuff. In effect, the cuffs are linked together like a chain,
while at the same time the wrists are kept pinioned in a rigid position,
and use of the hands is greatly restricted. Any exertion can be painful
if the cuffs are applied tightly.
30. CUFFING BEHIND THE LEG. This method is especially good when a lone
air policeman is transporting a prisoner by automobile. It can be used
also to lock a prisoner to a chair in which he is sitting, the links of
the cuffs being passed around the rung or leg of the chair. The same method,
locking a single leg and arm together, may be used in the seat of a car,
or both legs may be passed through the loop of the arms.
31. CUFFING TO SOLID OBJECTS. When there are two or more prisoners,
they can be temporarily secured under light guard. In this case three pairs
of cuffs are used. An automobile tire chain, with one or more pairs of
cuffs is also useful in securing prisoners to a solid object. The chain
can be used together with the cuffs to wrap around the bodies of several
prisoners, thus restricting their movements.
32. CUFFING TO THE BELT. The wrists cuffed with the link under the belt
will greatly reduce the freedom of the hands and arms. This is a good method
when walking a prisoner a long distance or when transporting him by car.
Ideally, the belt buckle should be moved far enough around to prevent its
being loosened by the hands. The belt can also be used to restrict the
hands further when the hands are cuffed behind the prisoners back. Another
variation is to remove the belt and force the prisoner to hold up his trousers
with his hands.
Section XI Summary
33. RESTRAINT AND CONTROL. Additional principles for the air policeman
to apply toward successful adaptation to emergency problem situations are:
-
Display confidence and an objective attitude.
-
Remain alert and unbiased; examine, judge, and then act firmly and decisively.
-
Maintain a conciliatory, unexcited manner with a quiet, steady, yet authoritative
voice.
-
Do nothing to precipitate the need for force; permit anger to decrease
and exhaust itself if possible. Keep the incident from progressing beyond
the talking stage, if possible, thereby providing an opportunity for speech
to create an outlet for tensions.
-
Always use the proper way in approaching a recalcitrant individual.
-
Maintain safe offensive or defensive positions.
-
Maintain solid, balanced positions and concentrate upon breaking adversarys
balance.
-
Prevent adversary from using weapons for attack and protect your own weapons.
-
Be wary, prepared, and composed so as to be able to meet any situation;
avoid being lured into a dangerous position.
-
Use an aggressive approach to situations needing aggressive action. Avoid
indecision and follow through with any action decided upon.
Section XII Instructors Check List
34. CLASS ORIENTATION.
-
Statement of scope and objectives of program.
-
Background description of combatives.
-
Use of films corresponding with instruction. Stimulation of discussion
in reference to major points in film.
-
Explanation of class procedure, methods of practice, and evaluation.
35. CLASS SESSIONS.
-
Length of physical instructional period should not exceed one hour and
15 minutes.
-
Films are not to be included as part of the time allotted for actual physical
instruction period with the exception of training for special groups in
the program.
-
The "Learning Principle" will be followed regardless of the group type,
time allotted, facilities, or other elements at hand. The skills selected
for instruction should be in accordance with the principles of judo.
-
Evaluation and scoring of the individuals skill will be recorded periodically.
His ability will be tested in the form of contests or in simulated situations.
Prospective assistant instructors may be screened from participants showing
marked skill.
36. COMPETITIVE PLAY. Each session should include some type of competitive
play (randori judo) in which the individual may be able to exercise the
skills he has learned. However, competitive play must be controlled according
to the physical condition and the ability of the individuals in the group.
Round-robin competition may also be organized among the contestants and
their successful skill performance recorded. Teams may also be organized
and competition arranged.
37. ROTATION INSTRUCTIONAL PROCEDURE.
-
A large group may be handled by dividing it into small groups with the
various phases of the scheduled lesson plan delegated to senior instructors.
When the time allotted has been completed, the groups will rotate until
the full instructional plan has been fulfilled. For example, the groups
below are broken down by the head instructor, as follows:
| Group |
Time |
Activity |
| A |
15 minutes |
Movement, Position of Interrogation |
| B |
15 minutes |
Blows, Use of Club |
| C |
15 minutes |
Sleeve Leverages |
-
Upon fulfilling the time allotted, the head instructor directs the groups
to rotate. Then group A rotates to group C position, group C to group B
position, and group B to group A position. When group A reaches its initial
position and completes all phases of the instructional plan, the rotation
will have been completed.
38. PREPARATION FOR INSTRUCTION. Prior to class physical participation,
allow sufficient time to check:
-
The area for any obstructions or hazards.
-
Proper ventilation, shower facilities, participants workout gear, and
condition of their toenails and fingernails.
-
Photographs, charts, or any other training aids to be used.
-
The lesson plan for the day, time to be allotted, and what points are to
be emphasized.
-
For any additional remarks, individuals to be present, and scoring roll
call sheets to be used.
39. EVALUATION OF INSTRUCTION. Points to be observed in regard to individual
progress are:
-
Development of directional sense, coordination, and flexibility in both
the standing and ground positions.
-
Toning of the various muscle groups required in the application of combative
skills (strengthening of hand grasp, feet, calves, extensors and flexors
of the legs and arms, waist, back and neck).
-
Development of waist action (pivot) as required in the effective application
of the basic throwing skills.
-
Basic reflex action in falling, footwork, striking tactics, and basic ground
tactics.
-
Proper foot placement in the various positions (leverage).
-
Proper form in the basic combative skills.
-
A moderate ability in dodging offensive attacks, in fundamental maneuvering
of the opponent while in the ground or standing positions, and in the application
of basic restraint and come-along leverages.
-
Basic knowledge of the terminology of the combatives.
-
The ability to contest in the basic skills learned.
-
The ability to control physical action and the degree of calmness while
under adverse conditions.
-
Adherence to safety precautions in conjunction with consistent application
of the hygienic practices in the gymnasium.
-
Elementary knowledge of how to practice, prepare, and terminate the physical
workout.
-
Basic knowledge of the anatomy and physiology of the body.
-
Proper use of club as a means of control, attack, and defense.
-
Use of mechanical means of restraint (such as handcuffs) in conjunction
with application of restraint and come-alongs.
40. FACILITIES AND EQUIPMENT.
-
Facilities (Area)
-
Flooring area 24 x 48 covered with 3# Kapok-filled mats.
-
Other areas meeting safety requirements may be used.
b. Clothing and Equipment
-
Clothing. Fatigue uniforms or any durable clothing may be used.
-
Equipment.
-
Sufficiently thick mats (2" minimum) which will cover designated area for
combative instruction.
-
Judo "tatami" mats, mattresses, or other materials which may be substituted
and meet safety requirements may be used.
41. MANUALS.
-
Kodokan Judo, Kobayashi and Sharpe, Charles E. Tuttle Co., Rutland,
Vermont
-
Physical Conditioning, AFM [Air Force Manual] 160-26
42. FILMS.
-
Arrest and Search TF 1-4057.
-
Combative Measures (Judo) TF 1-4981.
-
Part II, Introduction for Air Police
-
Part III-A, Principles and Body Movement
-
Part III-D, Shoulder Throw
-
Part III-F, Hip Throw
-
Part III-L, Holding Techniques
-
Part IV-A, Parrying and Striking
-
Part IV-B, Standing and Ground Maneuvering
-
Part IV-C, Combinations and Counters