
Copyright © 1948, 2002 The Budokwai. Reprinted courtesy the Budokwai. All rights reserved.
Note: The throws shown in the illustrations are demonstrated by G.
Koizumi and T.P. Leggett.
Foreword
The illustrations in this booklet were originally published by the Budokwai in 1938. A fuller edition with instructions on the throws was brought out in 1941. The third revised edition with further instruction now appears for a specific purpose. This purpose is to contribute the proceeds of its sale to the Budokwai Building Fund, which the General committee has decided to raise in order to obtain larger premises, the pressing need of the society. The fund is to commemorate the societys 30th anniversary, and the amount aimed at is £20,000.
The Budokwai (the Way of Knighthood Society) was founded in January 1918 as an amateur organization, to facilitate the study of judo and kendo. Since then, it has been through the mill of trials common to all pioneers. However, through it all, the society has gathered strength and gained experience, and has emerged from the shadows, to find that it has outgrown the capacity of the present premises.
The new building should be a worthy commemoration and suitable as the permanent headquarters of the movement, with a dojo large enough for 100 students at a time and provision for residential students. This may sound ambitious but not irrational in the light of the progress the movement has made in recent years.
The task of raising such a sum may not be easy but difficulty is an incentive to life. So too is the study of judo. However: divided, we perish, united we conquer. I appeal to all those who share a common interest in judo and the Budokwai to give full support and co-operation to the General Committee for the success of their project, expedient and courageous.
G. Koizumi
January 1948
Judo
JU-DO: literally, JU means gentle, soft, tender, pliable; DO means road, or way. This name, or term, is derived from the fact that the main tactic of judo is never to resist, but to yield to ones opponents force. In feudal days, the art was monopolised by the samurai class and was more commonly known as Ju-Jutsu, or Yawara: it then played a vital part in mortal combat; therefore the art included methods too dangerous and harmful to be practised as a competitive sport. The late Prof. Jigoro Kano studied under various Ju-Jutsu masters and realised the merit of the art and the value of its training in mental and physical culture. With the idea of making the art safe to be practised as a sport by eliminating all dangerous methods, and selecting the best of all schools, he formulated a system, and called it Judo. In 1882, he founded the school, The Kodokan. But to prevent the art from being abused, and to avoid all undesirable elements, he made it a condition that the pupils admitted to the school must sign a declaration which includes the following:
The efficiency of the art depends on the skilful application of theoretical knowledge developed upon the experience of centuries. The skill is composed of technical accuracy, co-ordinated movements and initiative. Therefore to attain a high degree of proficiency, one must be prepared to devote lifelong study and practice, which entails attaining and maintaining physical vigour and progressive mental development. Light-hearted enthusiasm which fades in facing difficulties, slowness of progress or hard work, is a waste of time and energy for both the student and the teacher. The value of judo however, like food, depends upon digestion and assimilation: it can only be appreciated by experience.
The art of judo can roughly be divided into six technical sections:
Methods of Training
Practice and training in judo is conducted in three forms:
Judo students are graded according to the standards of skill attained.
The difference between such standards cannot be clearly defined. As with
music, or any other form of art, judgement must rely on the experience
and intuition of higher-graded judoka. The grades of the members of The
Budokwai are signified by the colour of the belts worn, as follows:
| 6th Kyu | White |
| 5th Kyu | Yellow |
| 4th Kyu | Orange |
| 3rd Kyu | Green |
| 2nd Kyu | Blue |
| 1st Kyu | Brown |
| 1st Dan (and above) | Black |
In judo there is no top limit; nor are there championships.
Balance
Judo, as a combative art, or a means of mental and physical training, or of moral and spiritual education, fundamentally evolves on the principle of balance, as do all things in the universe. Duality is the ordered state, and providential arrangement for animation and progress Life. Life is action action to attain the balanced state, or unity of opposites a state of non-action. As far as man is concerned, the value and satisfaction of life are derived from that striving for unity with nature and God. So it is with judo.
In action, balance must be retained: yet to achieve an object, one must run the risk of losing it. In this enigma of the natural law, judo finds its life as a sport and combative art.
It may be said that a human body, in its standing position, is in a balanced state when the trunk of the body, in the upright posture, is held directly above the feet. However, the nature of the human body is such that, if pulled or pushed, especially the upper part, it is not an easy matter to retain that state of balance without moving the feet. For this reason, in judo the feet are kept about 18 in. apart, so that, while they form a suitable basis for the body, they can be moved easily and swiftly, and the weight of the body can be transferred from one to the other as circumstances demand.
Under the circumstances of contest or combat, to judge clearly, and to command quick action, one must have calm mental balance. This mental balance depends, in turn, on the spiritual balance, or a clear conscience. Thus it will be seen that the study of judo does not remain solely on the physical plane; also, despite the drastic nature of its objectives, judo is not prone to be submissive to the influence of an evil power. In fact, the maxim of judo is:
"Least used: best served."
No throw or lock can be applied effectively against the opponent who retains the state of balance. Therefore, the first, and most important thing in judo is to disturb the opponents balance, whilst retaining ones own. The formula for disturbing the opponents balance when he is passive is as follows:
If this formula is applied correctly, no one irrespective of weight
or strength will be able to resist, even against the force of one finger.
When the opponent is active or risking his balance, however, the principle
is applied by synchronising with the opponents movement in direction and
speed, or by merely yielding to the opponents force, needing less effort.
Such action, if accompanied by others which prevent the opponent from moving
his feet, either results in a throw, or he will be reduced to a helpless
condition. Skill, indeed, largely depends upon the ability to apply these
principles at a suitable moment in an appropriate direction. The counter
move against this principle is naturally to reduce the angle to less than
90 degrees by the movement of the hips.
Body-mechanism and its Efficiency
Broadly speaking, there are two ways of using the Body-mechanism, Positive and Negative. The positive way is to use the whole body as a solid lever or stick, by the co-ordination of all the muscles: this is chiefly used for offensive purposes. The other (negative) way is to relax the muscles to make the body flexible, s that the effect of the force applied by the opponent can be localised or nullified. The efficiency of the body-mechanism is governed by the law of dynamics and leverage. According to the maxim of judo, "Maximum efficiency and minimum effort," these laws, applied to the human body, should be carefully studied, especially when they are related to equilibrium and gravity. For without a sound knowledge of how to make effective use of the Body-mechanism, it will be impossible to take advantage of the opponents weakness or sate of weakened balance.
A lever or stick used for pushing or pulling an object is effective if it is used lengthways but not if used sideways. (Figure 2.) The same applies to the "body-lever" formed for positive use. But the nature of the relation of ones body to ones opponents is such that application of this principle of lengthways use is possible only by curving the "lever" slightly, and using it in the line of the curve. Such a curve should be of the full body-length, from the toes to the ends of the fingers. The driving power for the "lever" is derived from the weight of the body; in other words, from the abdominal power or hip movement, not from a local use of arms or legs. (Figures 3, 4, 5).

Owing to the complex nature of the "lever," compound movement of the arms, legs and trunk of the body becomes necessary. Assuming you have normal contact with the opponent and yourself roughly form a ring. To use your arms lengthways in this case, it is necessary to turn that ring in the way you turn the steering wheel of a car. This means your right and left hands are moved at the same time, with the same speed, and in the same direction. Such action is possible only by moving the whole body as one. At the same time, the wheel, which is roughly formed by the trunks of the two bodies, is turned on a horizontal axis. (Figure 6.)
In some cases the "lever" is formed on one side of the body, from the toes to the fingers, and it is used as if it were pivoted on the hip-joint of the other side, so that the foot and shoulder move in exactly opposite directions. (Figures 7, 8.)
These are the basic principles for the efficient use of the body-mechanism
but, as to the actual manner and ways of application, much depends upon
the circumstances, and it is beyond verbal description. However, I must
add that, whilst these movements are the most effective ways, they are
defenceless when counter-attacked. The counter-attack in turn is also open
to further counter-attacks. So proceeds the process of sport. Strength
and weakness are really one: but it is a matter of different aspects.
Tsukuri and Kake
Tsukuri means "making" making an opening; kake, applying applying a throw. The action of a throw should be one continuous movement, without any stages or divisions. But as a matter of convenience, it has been treated and studied in two stages, tsukuri and kake.
Every throw must have its own particular opening. Thus, a throw to be applied depends upon the circumstances, the state of the opponents balance, the direction of weakness and the direction of movement, also upon your own relative position and the manner of your contact with the opponent.
Basically, tsukuri is effected by:
So it is with the human body. With the exception of those throws applied to the front of the opponent, or directly backward, at the completion of tsukuri the opponent should be balanced upon the toes, or heel, of one foot. As you effect such a condition of tsukuri, to be able to take the advantage thus created you must prepare yourself by placing yourself in a suitable position and adopting the correct posture. In doing so, you must be very careful not to lose your control over the "box."
Actually, tsukuri can be effected in every possible direction, but for convenience, it is studied in eight standard directions front, back, left, right, right (and left) front corners, right (and left) back corners. Kake is executed in the manner of turning a box on a corner or tipping it over an obstacle (part, or parts, of your body) which is placed at a point lower than the centre of gravity.
A throw, in actual combat, is executed in such a way as to crush the opponents head or shoulder against the ground: but in practice the opponent is helped to land on his back. In order to make the practice more safe and enjoyable, at the moment the opponents body comes into contact with the ground, a slight lift is given to one of his arms or shoulders (the one nearest you) by straightening your own trunk into an almost upright position: this will turn his body slightly on to one side, and help him do the breakfall with one arm. Then, if required, you are in the position to deliver a finishing touch to the opponent.
In tsukuri and kake, every part of your body wrist, arm, spine, legs, neck and feet should be curved, and the whole used as a solid stick, sideways. In effect, the two bodies (your own and the opponents) are moved as a solid body, in order to make full use of your body movement; the arms should not be used locally, but as the transmitters of the bodily power.
It is impossible to over-emphasise the importance of Tsukuri, for it
is estimated to form 70 percent in affecting a throw. Tsukuri in a throw
is like courting in love; without it, the result will be a disaster.
Breakfalls
In order to minimise the shock to the body in taking the throws, you
must learn the art of the breakfall before you start to practise throws.
There are many methods, but the chief one is to strike the ground with
one or both arms at the moment the body touches the ground. The arm should
be kept straight but not stiffened, and swung like a whip (not like the
motion of hammering): the body should be curled up, keeping the head well
off the floor, and the legs up in the air.
Dojo
The hall used for judo training is called a dojo. Do means way or road; Jo place. The term implies a place for the study of the "way." It was originally used by the Buddhists to denote the hall for meditation and study. Dojo is regarded by them as a sacred chamber and in it silence, cleanliness and simplicity are strictly enforced. Before entering it one is expected to cleanse not only ones body, but ones mind, for the mind stained with prejudice or emotion is not capable of clear thinking.
Judo training is similar in its ultimate object and process, though it enters from the physical aspect. So, the disciplinary rules observed in a judo dojo should have much in common with those of a Buddhist dojo. In it smoking, drinking or loud comments should be barred.
A dojo should be airy and its floor covered with mats, soft but firm
enough to withstand the weight of a man without the foot sinking into them.
Japanese judo mats [tatami] are ideal but wrestling gymnastic mats or layers
of thick felt covered with smooth canvas will serve the purpose.
Keikogi or Judogi
The costume worn for the practice of judo is called keikogi or judogi.
It consists of a jacket, a pair of trousers and belt. The material used
should be strong yet soft enough for the comfort of the skin. The sleeves
should cover the elbows, the trousers the knees. As a temporary measure,
an old coat with the buttons removed and a pair of shorts will serve the
purpose.
Techniques
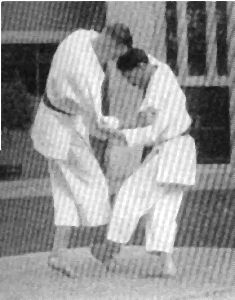
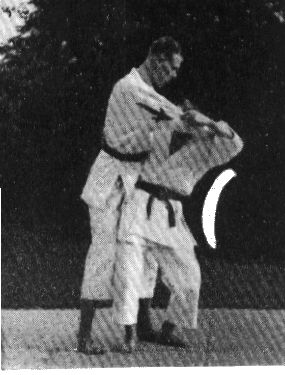
Tsukuri to the front

The opponent is drawn on to the tips of his toes to balance himself, showing that, if the joints of his body were immobilised, the body would be in a very precarious position. The slightest touch would be enough to cause it to fall. Opening for hip, shoulder, ankle and stomach throws.
The thrower is seen in a well-balanced position. The bending of the knees and ankles has increased the area of the base, thereby the stability. This enables him to free one leg for action by supporting himself on the other.
Note the upright posture of the trunk of the body, the curve of the arms and wrists and the firm hold on the mat with the full feet.
In practice, this tsukuri should be effected when the opponent moves
forward, keeping the body upright or curved slightly forward.
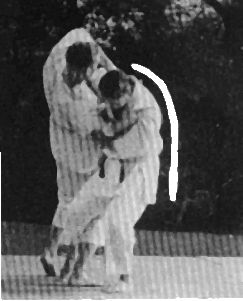
Tsukuri to the right front corner
The opponent is balanced on his right toes. This is the opening for ankle throws, various hip throws and hand throws, including ukiotoshi, taiotoshi, seoyenage, kataguruma, haraigoshi.
The posture and action of the thrower is very similar to illustration 1 except that his left foot is drawn back and the body is turned to his left. Note the direction of pull with his left hand. In study the actions and movements may be divided into sections, but in practice the whole must flow continuously without a break and different parts of the body must be moved simultaneously. For instance, in pulling or pushing, as you move your shoulder or shoulders, your foot must be moved at the same time.
This tsukuri is best applied when the opponent takes a step forward
with his right foot.
Tsukuri to the right side
The opponents body is forced to balance itself on the outer side of his right foot, almost pinned down to the mat.
An opening for hand and leg throws.
The thrower has taken a short step to his left, almost balancing himself on his left leg. The body is curved slightly to his left, the hands moving as for turning a wheel. In making these movements you should move your hips to the right, otherwise you will overstretch your body and lose balance.
This tsukuri is applied when the opponent sways his body sideways.
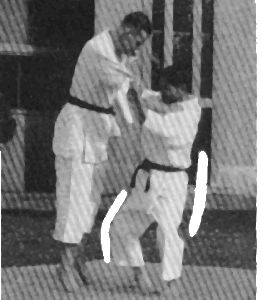
Tsukuri to the right back corner
The opponent is forced to balance himself on his right heel, the body bent backward.
Opening for leg throws to the opponents right back.
The thrower has taken a step with his left foot to the outer side of the opponents right foot. The body is curved to his left front by moving his hips backwards. The wrists are curved, hands are moved in a circle like a wheel.
This tsukuri is effected when the opponent, who is holding his body
stretched back, steps backward with his right foot.
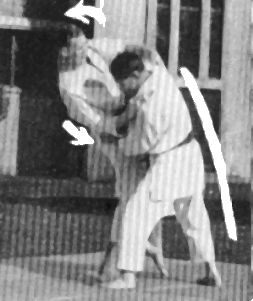
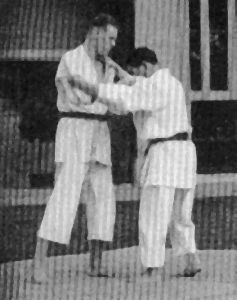
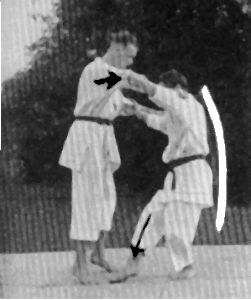
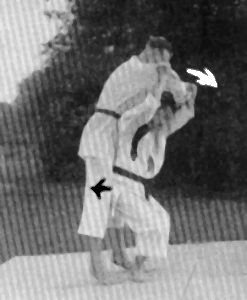
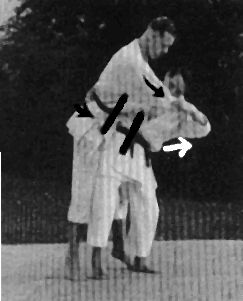
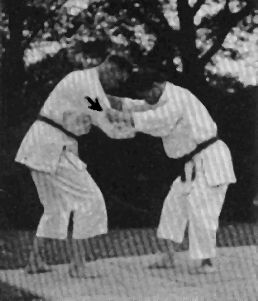
Hand throw (tewaza) to the right front corner
Stage 1.
The opponent is on the point of resisting against the throwers pushing.
Note the throwers curved left wrist and the tension and its direction on the opponents sleeve.
Hand throws may appear simple when demonstrated but require much more technical accuracy than any other throw. This is the reason they are not often seen on the mats in contest.
Technically, hand throws are a continuation of tsukuri without visible use of the rest of the body. In practice it is almost impossible to apply when the opponent remains passive. You must have the opponent in action, voluntarily or involuntarily.
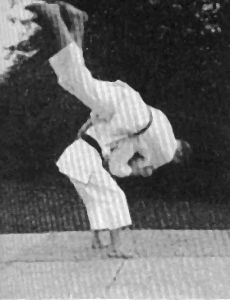
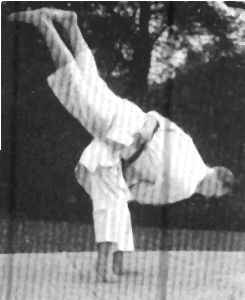
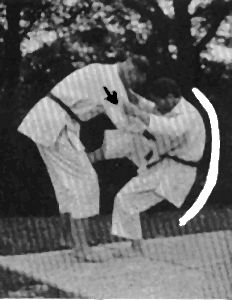
Stage 2.
The opponent is on the point of being forced to somersault. His right shoulder is pressed towards his right foot.
As the opponent resists, the thrower, synchronising his movement with the opponents, turns his own body to his left, drawing his left foot to the rear, and bends his body to his left, turning and pressing the opponents body towards his right toes. In turning his own body the thrower should turn his left hip to the rear, pivoting on the other.
This movement must precede the footwork. The part of the opponents jacket between the hands of the thrower should be retained in a taut state right through the action.
At the end of the action the thrower should be balancing on his left foot.
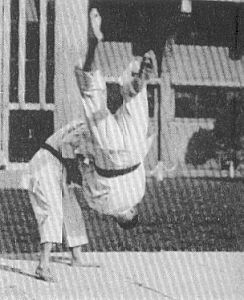
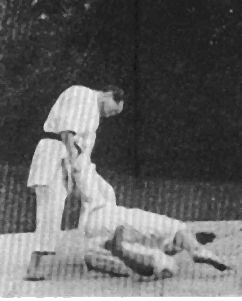
Stage 3.
The opponent is shown here doing a breakfall. Note the body is curled up so that the fall can be turned into a roll n order to minimise the effect of shock and as a defence against further attack. The head is bent forward to prevent jerking the neck. The legs are held up to centralise the weight of the body and to reduce the area of the impact. The left arm is doing "whipping" as the body comes into contact with the mat.
The thrower is giving a lift to the opponent to lighten the fall. The trunk of the body is in an upright posture. The stance and general posture shows potential power for further attack with an arm lock or holding or atemi [strikes].

The defensive posture in taking a throw.
When thrown, you should close your body against the thrower with bent leg and arm and watch the thrower. In judo practice you should remember the fact that judo is an art employed in a life and death struggle. The opponent is presumed to be an enemy who is after your life. Therefore, in practice, a watchful lookout on the opponent should be maintained, and the mental habit of alertness, calmness and resourcefulness should be cultivated.
The competitive spirit is natural and instinctive with man, and the
fundamental urge for progress. But like all things, its value depends on
the way of using it. When judo training is overdosed with it, judo becomes
so-called "Contest Judo" and opens the door to brute force and dangerous
methods which are directly against the principles on which judo was founded.
Trying to avoid a clean throw by stretching the arm or twisting the body,
without doing a breakfall, is often the cause of an accident. Beginners
especially should play for safety and do a breakfall when thrown.
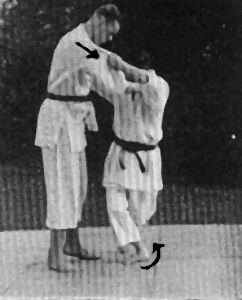
Advancing ankle throw (de-ashi-harai)
Stage 1.
The opponent is about to move his right foot forward, being drawn by the throwers retreating movement.
The thrower is moving his right foot to his rear, drawing his opponent to him.
Note the gentle curves of his arms and wrists, and the taut state of the opponents jacket at the parts where the two bodies are connected. This state is called "contact." The contact thus gained should be maintained right through the action until the throw is accomplished. Loss of contact, no matter how short the period, will give the opponent a chance to regain his balance and you will lose the continuity of movement. This point should be most carefully observed especially when major body movements are involved, as in the case of hip, shoulder and body throws.
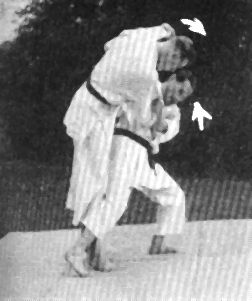
Stage 2.
The opponent is on the verge of being thrown, his right ankle being swept away in the direction it was moving at the moment when the weight of the body was being placed on it, and his right sleeve being pushed directly downward.
The thrower, balancing himself on his right foot, sweeps the opponents advancing right ankle with the sole of his left foot and at the same time pulls the opponent downward on his right sleeve. The left leg should be turned as far as possible and stiffened. The driving power of sweeping should be derived from the hip movement.
Stage 3.
The opponent is on the point of doing a breakfall, holding on to the thrower with the right hand.
Ankle throws are beginners throws for their simple technique. At the same time they are favoured by those who have advanced in skill and age for their exacting technical nature and as requiring the least exertion of all throws.
In manoeuvring for deashiharai, while drawing the opponent more to your
right, your right foot should be drawn to the back of your left foot.
Drawing ankle throw (tsurikomi-ashi)
Stage 1.
The opponent is gently drawn on to his toes.
The thrower, with a light swaying motion, drawing the opponent on to his toes, is drawing his right foot to his right back (sometimes to the right).
The arms are kept wide apart, forming a circle with the opponents shoulder line. But at this stage the arms and shoulders should show no sign of activity except the wrists which are lightly curved, in the line of the circle. The extent of the sway and footwork should be enough to cause the opponent to balance comfortably on his toes. Excess will cause the opponent to move his foot or feet. Insufficiency will have no effect on the opponents balance.
Stage 2.
The opponent, being pivoted on his left toes, is in such a position that he must move his right foot forward if he is to prevent himself from falling.
The thrower, pivoting on his right toes, is turning his hip and body to his left, drawing the opponent as above. Note that the throwers body is lightly curved forward and the arms are in the same relative position to his body as in the illustration for Stage 1. The tension of the jacket at the opponents right sleeve indicates the direction of the pull, while the right hand is backing that pull. The left leg is stretched out, and the sole of the foot is in contact with the opponents right ankle. The right knee is bent. However, the left foot should not reach out; the opponent should be drawn towards it.
Stage 3.
The opponent is being made to somersault over the throwers left leg.
The thrower is executing the throw by turning the body further round to his left and pushing the opponents ankle with his foot.
The action of the left foot should not be kicking or hammering, for the effect of such action ends at the impact. But pushing starts to take effect on contact.
Note stance and posture of the thrower, the two bodies being balanced on his one leg.

Stage 4.
The opponents body is now being turned over, falling on his back: the arm is raised for the breakfall.
The thrower has brought down his left foot to the ground and the left arm shows how it is used for turning the opponents body.
This throw can be applied also when the opponent starts to move his right foot forward from his rear.
Sasai-tsurikomi-ashi is very similar to this throw but it is applied
when the opponent is balancing himself on his right foot.
Sweeping ankle throw (o-kuri-ashharai)
Stage 1.
The opponent is about to take a side step with his right foot, in a buoyant manner.
The thrower is synchronising his movement with the opponents. Timing and synchronisation are the most important factors for this throw. When they are correct the throw will be very fast and a surprise to the opponent. But the opening does not occur very often, especially with experienced judoka. However, practice of this throw is fine training for attaining co-ordination of the mechanical parts of the body.
Stage 2.
The opponent is lifted on to his toes and the left foot is being swept towards his right foot.
The throwers right foot, following the opponents left foot as it moves, is sweeping it in the direction of the other, while his hands are lifting the opponent upward. The right leg is straightened stiffly and turned so that the sole of the foot comes in contact with the opponents left ankle. The wrists are turned and curved upward; the left leg is straightened. The power of sweeping and lifting should be derived from the hip and abdominal action, and the foot should be swept along the surface of the mat.
Stage 3.
Note the posture of the opponent in taking the throw and doing a breakfall.
Also the way the thrower is giving a helping lift to the opponent. This
throw can also be applied when the opponent retreats, drawing one foot
towards the other.
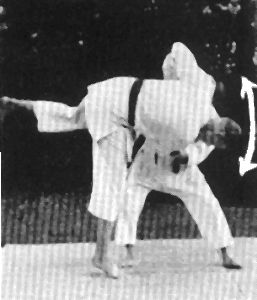
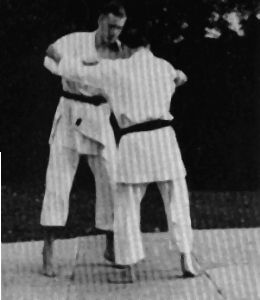
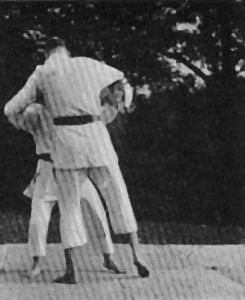
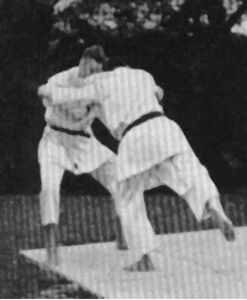
Major outer reaping (o-soto-gari)
Stage 1.
Tsukuri for this throw is effected as described as shown above, under tsukuri to the right back corner. But in contest, this tsukuri is generally effected by firstly pulling the opponent forward with your right hand, then describing a circle upward with the right hand, turning the pulling into pushing backwards and downwards. In doing so the wrist should be curved downwards and the contact gained in pulling should never be lost.
Sometimes the opening is provided by the opponent moving his right leg across your front.
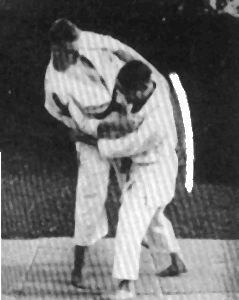
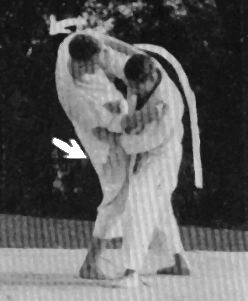
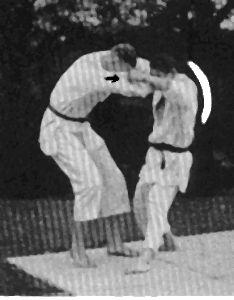
Stage 2.
The position of the opponent is further weakened, the right elbow being pressed against the belt and the right leg pressed forward by the throwers right leg.
The thrower bending his body forward, and pressing the opponents right elbow towards his belt and pressing the back of his own right leg against the back of the opponents right leg, completes tsukuri.
Note the curve of the throwers spine and the bending of the joints at the knee and ankle.
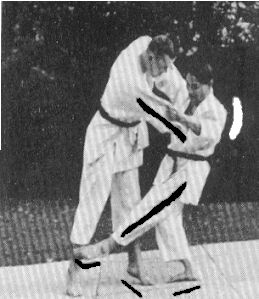
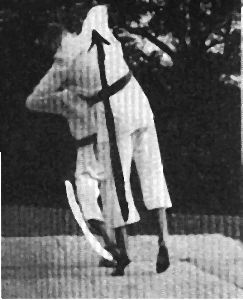
Stage 3.
The opponent is on the point of being thrown. He is helplessly overbalanced in the direction of his right back.
The thrower is lightly leaning forward and balancing the opponent on the outer side of his right heel, ready to reap the opponents right leg.
The action of reaping should be that of the right side of your body from the foot to hand, stiffened as a solid stick and worked as if it is pivoted on the left hip joint, enforced by the backward movement of the hip. The toes should slide along the surface of the mat.
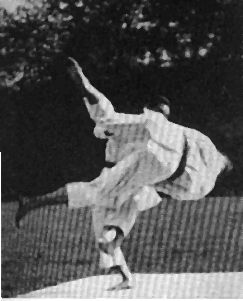
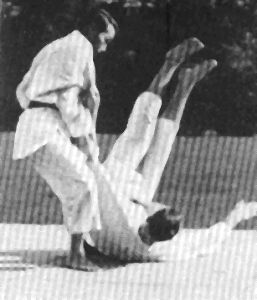
Stage 4.
The thrower, reaping the opponents right leg, has made him take a back dive.
In practising this throw, care should be taken not to force the reaping,
for such action is often the cause of injury to the knee. If tsukuri is
properly effected there should be no need of forcing. Injuries to the knee
always leave it weak and often develop into a form of rheumatism. This
is the reason leg locks are barred in judo contests.
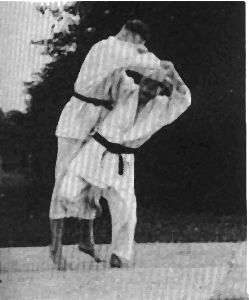
Shoulder throw (seoye-nage)
Stage 1.
The opponent is drawn forward and balancing himself on his toes.
The thrower draws the opponent lightly enough to balance him comfortably on his toes. At the same time he lowers his body by bending his left knee and ankle, and curves his body forward. In so doing he moves his right foot to the front of the opponents right foot, without moving his body. He remains balanced on his right leg.
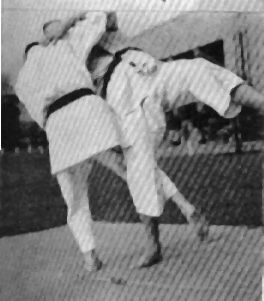
Stage 2.
The opponents body is held in firm contact with the throwers back.
The thrower, pivoting on his left toes, turns his body to his left, then with a jump makes a left about turn and contacts his back with the front of the opponents body. At the same time he passes his right hand under the opponents right armpit and grips the opponents jacket by the shoulder.
Note the bent knee and ankle, curved back, the direction of pull, and push with buttock.
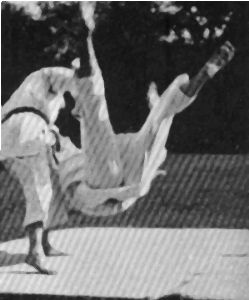
Stage 3.
The opponent is seen here being turned over the throwers shoulder.
The thrower, hunching his back and pushing the opponents legs with his buttock backwards, turns the opponent over his right shoulder. The contact obtained in pulling must be maintained right through the action.
Note the bending of the body and the stance.
Stage 4.
The opponent is "heading" for the mat, showing that without the throwers timely helping lift, his head and shoulder will be crushed against the mat.
The thrower can use his right forearm bent against the opponents right armpit instead of in the way described. Also the throw can be applied by kneeling down on the right knee (seoye-toshi).
It should be remembered that this is one of the hand throws, and the
general effect should be like flinging a towel over the shoulder, not lifting
on the shoulder.
Hip throw (o-goshi)
Stage 1.
The opponent is held firmly between the throwers body and right arm, and drawn slightly forward.
The thrower, turning his body as in stage 1 and 2 of the shoulder throw, bends his body to his left and, passing his right arm under the opponents left arm, encircles the opponents body by the belt, and draws the opponent firmly against his right side.
In turning his own body, the thrower should not move his right side forward or bump or push the opponent.
A common fault connected with this throw is that in the attempt to get the body contact, the right side of the body is moved forward with the foot or by thrusting the right arm forward to push the opponents body.
The pull with the left hand should be retained, outwardly right through the action of the throw.
Stage 2.
The opponent is drawn on to balance himself on his toes.
The thrower, gaining the contact of the bodies, sways to his left, so as to balance the "box" formed by the two bodies on its one corner his left foot.
In swaying, the thrower should not bend or move his body away from the opponent but the two bodies are moved as one solid mass. There should be no sliding between the two bodies.
Stage 3.
The opponent is being turned over the throwers hip as if turning over a parallel bar.
The thrower, to complete the throw, moves his left hip backward and
bends his body further to his left, turning the opponent on the edge of
his right hip. The right side of the body should not be used so as to push
the opponent forward. Instead of swaying, the opponent can be lifted by
straightening the legs but this involves expenditure of more energy than
the other method.
Body drop (tai-o-toshi)
Stage 1.
The opponent is slightly drawn forward.
The thrower, drawing the opponent forward, moves his left foot to the left front of the opponents left foot describing with it a semicircle behind his right foot.
Taiotoshi is one of the hand throws and very popular. There are a number of variations in the manner of application but the one illustrated here is the basis of all.
The main effect of this throw is that the opponents body is "wheeled," the foot as the hub, the body as the spoke. The throwers body does not necessarily come into contact with the opponents, except the hands.
Stage 2.
The opponent is now made to balance himself on his right toes.
The thrower, balancing himself on his left leg and bending his body to his left, thrusts his right leg across the front of the opponents right leg, preventing it from being moved forward. The action of the right hand illustrated here is one variation: in the basic throw the right hand should press the front of the opponents shoulder throughout the movement.
Stage 3.
In completing the throw the thrower bends his body further to his left, the left forearm almost touching his left knee, and curves his body forward by moving the left hip backward. The opponent will then be thrown somersaulting over the throwers right leg.
When the opponent is moving forward, this throw can be applied in the
same way as the hand throw to the front, except the action of the right
leg.
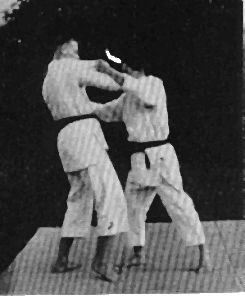
Spring hip throw (hanegoshi)
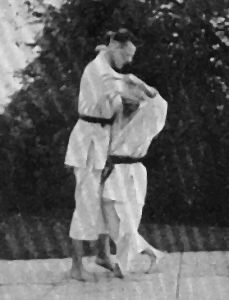
Stage 1.
The opponent is drawn forward by the thrower.
The thrower, drawing the opponent forward with his left hand, moves his left foot close in the front of the opponent. At the same time, thrusting his right hand behind the opponent, with the palm of the hand presses the opponent forward and upward by his shoulder blade.
At this stage the two bodies should form the letter T.
Note the direction of pull indicated by the tension of the opponents sleeve and the relative position of the two bodies and feet.

Stage 2.
The opponents body is balanced on the throwers right side as if it were laid out on a rack.
The thrower, keeping the contact of the bodies firmly and the left leg straight, sways to his left in order to bear the weight of the two bodies on his left leg alone. In doing so, he bends his right leg at the knee and places it across the opponents legs. Then keeping the right side of his body straight and stiff, he bends his body to his left, pivoting the movement on the left hip joint. If the movements be correct, neither opponent nor thrower should feel any strain.
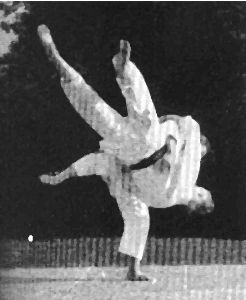
Stage 3.
Stage 4.
The final stages of the throw.
Hanegoshi is one of the hip throws but the most important thing is to keep a close contact of the chests. In swaying and bending the body as described the two bodies should move as one mass. The thrower should not move his body away from the opponent, nor let it slide against him. An opening for this throw occurs when the opponent curves and inclines his body forward.
As a variation, the throwers right hand may remain at the opponents
left shoulder and be used to pull the opponent upward by bending the wrist
in an upward arc, and moving the arm as if expanding the chest. The left
leg may be bent and used as a spring to lift the opponent, the right leg,
to push the opponents legs. Such actions may be effective but require
more energy and are lacking in polished effect.
Winding spring hip throw (maki hanegoshi)

Stage 1.
This throw is a combination of two throws, uchi-makikomi and hanegoshi. Technically it is very similar to hanegoshi except the employment of the hands and arms.
The thrower moves in to get the contact of bodies as for hanegoshi, but with his left hand he grips the outer end of the opponents right sleeve, with the right, the inner side of the same sleeve, near to the shoulder, and presses the elbow against the opponents chest.
The opening for this throw occurs when the opponent approaches the thrower with his right arm extended.
It is not only a severe throw but involves a difficult feat of balancing on one leg. Students are advised not to try this throw until they have gained full command over hanegoshi.
Stage 2.
The opponents body is stretched out and balanced on his toes.
The thrower, having placed his right leg against the opponents leg as for hanegoshi, is pulling the opponents right arm forward and upward, levering the right arm against the opponents chest.
In order to stabilise his balance, the thrower should curve his body slightly forward and bend his knee and ankle.
Stage 3.
The thrower completes the throw by turning his body to his left and "winding" the opponents body around his.
In "winding" the thrower should pull the opponents body by stretching
his own body lengthways.
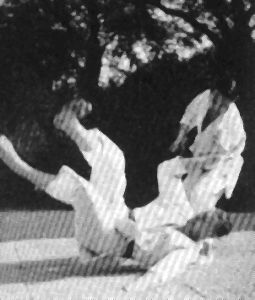
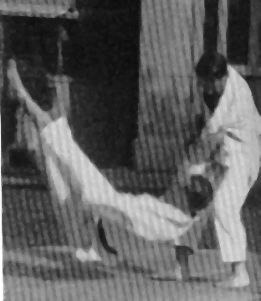
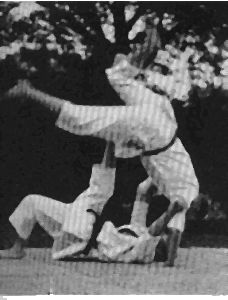
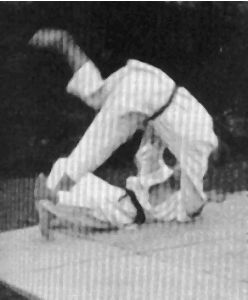
Stomach throw (tomoe-nage)
Stage 1.
The opponent is held in an almost immobilised state, the body being bent and pressed towards his toes.
The thrower, taking a short step back, bends his body forward, forcing the opponent to do the same. At the same time the thrower hunches his back and, bending his wrists down, presses the opponents body toward his toes with a bodily movement.
Stage 2.
The opponent is drawn forward and balanced on his toes.
The thrower, maintaining his posture and contact as at stage 1, takes a short step forward with his left foot, moving the whole body as one in the line of curve formed with the body. At the same time he lifts his right leg and places the ball of the foot at the centre of the opponents body just below the belt. The action should be more like sliding in than falling back.
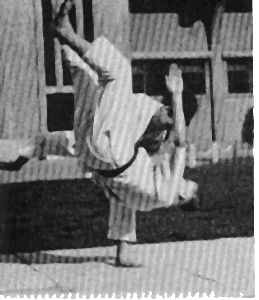
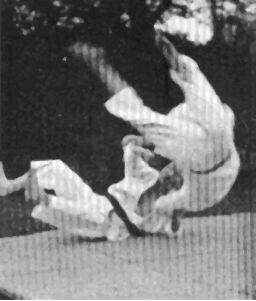
Stage 3.
The opponent, placing his right hand on the mat beyond the throwers left shoulder, is about to take the throw with a rolling breakfall.
The thrower, continuing the sliding down movement, rolls on his back on the mat and in so doing stretches his right leg and pushes the opponent over his head.
The general effect of this throw is more like rolling a hoop, roughly formed with the two bodies. Thus very little push is needed to complete the throw.
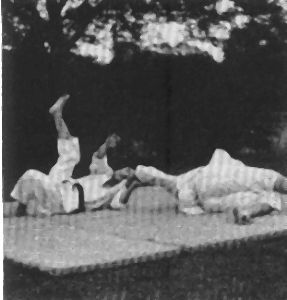
Stage 4.
The last stage of the throw.
In practising this throw great care should be taken not to kick the opponent or force the throw, and to release the hold on the opponent at the end of the throw. It is important for safety in practising this throw that students should master the rolling breakfall beforehand.
The opening for this throw occurs when the opponent bends his body forward
or pushes with his weight.
Side body throw (yoko-sutemi)
Stage 1.
The opening for this throw occurs when the opponent crouches in a defensive manner. The opponent is seen here crouching, the legs widely apart.
The thrower is in the act of taking a step to the opponents left with his right foot. In commencing this movement the thrower should hunch his back and hang on to the opponent, drawing him forward with a slight lift.
Stage 2.
The opponent is drawn forward and being turned to his left, pivoted on his left foot.
The thrower, balancing himself on his right foot, is turning his left hip in order to turn the whole of his body, drawing the opponent with him.
Note the throwers stance, posture, hunched back and the direction of pull, indicated by the tension on the opponents sleeve.
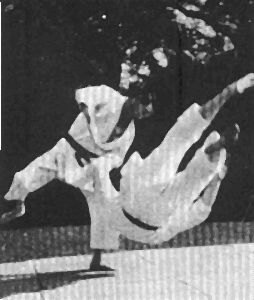
Stage 3.
The opponent is on the point of being thrown and placing his right hand on the mat preparatory to doing a rolling breakfall to his right front.
The thrower as he makes a right turn throws himself in a downward curve to the mat, landing on his left side, throwing the opponent over his left shoulder. In doing so the thrower lifts his left leg to catch with it the opponents right leg by the ankle.
Stage 4.
The opponent is taking the throw by somersaulting.
The thrower rolling on his left side completes the throw.
In practising this throw the thrower should be very careful not to pull the opponent by bending his arms, for such action is often the cause of an accident.
The throw should be executed with the weight of the body and the effect
is that of rolling a ring.