Journal
of Non-lethal Combatives, Oct 2000
The Secrets of Jujitsu, A Complete Course in Self
Defense, Book IV
By Captain Allan Corstorphin Smith, U.S.A.
Winner of the Black Belt, Japan, 1916. Instructor of Hand-to-Hand Fighting,
THE INFANTRY SCHOOL, Camp Benning, Columbus, Georgia and at United States
Training Camps and Cantonments, 1917 and 1918.
In Seven Books.
BOOK FOUR
STAHARA PUBLISHING COMPANY
Columbus, Georgia, 1920.
***
This electronic version is copyright EJMAS © 2000. All rights
reserved.
Contributed by Thomas J. Militello, a 15-year member of Astoria,
New York's non-profit Horangi Taekwondo Dojang, which is headed by James
Robison.
Readers interested in seeing film images should note the following
film held by the National Archives and Record Administration:
NWDNM(m)-111-H-1180.
Title: Physical and Bayonet Training, 1918.
Scope and Content: Recruits at Camp Gordon, Georgia receive detailed
instruction in boxing and jiu-jitsu. Wrestling and jiu-jitsu holds are
used against a foe with a bayonet. Troops do calisthenics and play rough
games calculated to make them physically fit.
35mm film, 15 minutes
See also Don W. Farrant, "Vintage Jujitsu: World War I Style," http://www.blackbeltmag.com/searchdb/bbm/1971/133.html.
Judging from responses from the US Army historians at Forts Myer
and Benning, little biographical information is available concerning Captain
Smith. Therefore readers with additional information are requested to contact
the editor at jrsvinth@juno.com.
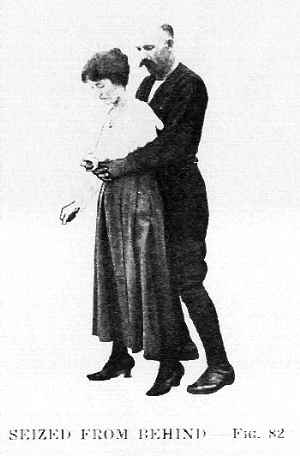
SEIZED FROM BEHIND -- Fig. 82
If an assailant seizes you around the waist from behind, you may be
able to get one of his fingers and so pry his grip open.
If he is a strong man, however, you will have difficulty in getting
hold of a finger, and you will simply lose time making the effort.
Further, you will accomplish little, even if you break his hold, for
he is still behind you and can strike you, or get a hold on you.
In a real fight if you broke his fingers he would kick, with more effect
on you than breaking his fingers had on him.
LESSON 12
This lesson teaches you --
How to make the elbow blow to the solar plexus when seized from behind
above the arms.
It also teaches you to keep your balance, and makes you expert in the
use of the elbow blow under any circumstances.
| |
Name of Partner |
Date Commenced |
Elbow blow to the solar plexus when seized form
behind above arms |
| 1. |
|
|
|
| 2. |
|
|
|
| 3. |
|
|
|
| 4. |
|
|
|
| 5. |
|
|
|
| 6. |
|
|
|
| 7. |
|
|
|
| 8. |
|
|
|
| 9. |
|
|
|
| 10. |
|
|
|
Make a check mark against each trick each day you practice it.
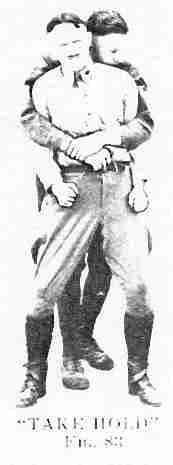
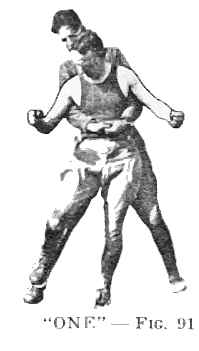
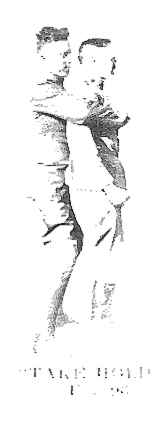
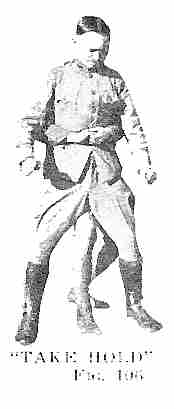
SEIZED AROUND WAIST FROM BEHIND ABOVE ARMS
"TAKE HOLD".
When an Assailant seizes you around the waist from behind the most effective
defense and the quickest escape is the elbow blow.
"ONE"
If his great strength makes movement impossible, stamp with your heel
on his instep or kick him savagely on the shin.
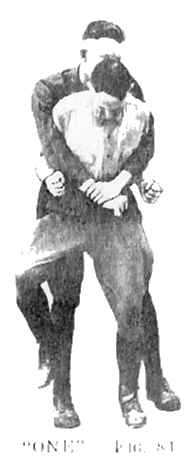
Such a trick will momentarily weaken his hold and in that psychological
moment twist down and out.
In practice make the kick with the strength of your whole body, not
merely with the leg muscles. "Put your Stahara into it," but stop a few
inches from the mark at which you aim.
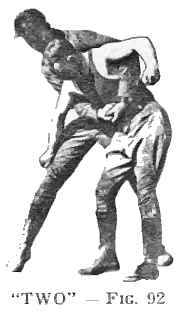
"TWO"
Slip down through his arms, turning the left hip forward, swinging on
the balls of the feet, making the effort from the Stahara.
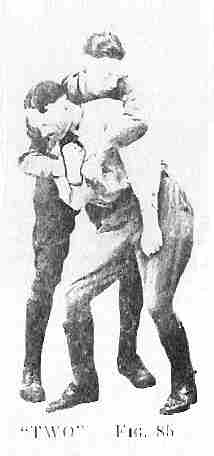
Simultaneously bring your right elbow directly in front and six or eight
inches away from his solar plexus (the pit of his stomach).
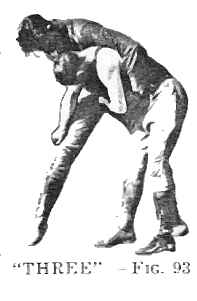
"THREE'
Drive your elbow into his solar plexus. In practice put all your force
into the blow but stop it three or four inches from the target.
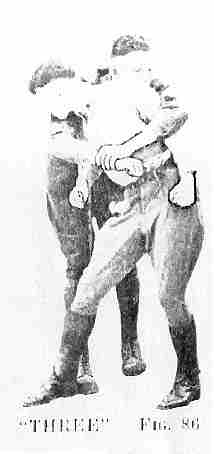
This blow properly delivered will knock him out. If not, repeat it till
he drops.
Assailant must hold you lightly. In a real attack he would hold you
tightly but the kick you would give would loosen his grip.
In order not to forget this kick in a real fight always practice it,
counting audibly:
| "TAKE HOLD" |
Assailant seizes you. |
| "ONE" |
Simulate the kick with all your strength. |
| "TWO" |
Twist down out of his grip, bringing elbow forward. |
| "THREE" |
Drive elbow back. |
You will soon acquire a Houdini-like expertness in wriggling out of
Assailant's grip, if you practice steadily. This practice is a most valuable
exercise as it reaches every muscle in your body and teaches you to coordinate
your movements.
It makes you alert and able to take advantage of an opening. The untrained
man would be so clumsy, and delay so long after the kick, that he would
lose the advantage of Assailant's momentary weakness.
When an Assailant has you in any kind of a grip that prevents your delivering
a vital blow, always make a primary attack, which, though not sufficient
in itself to defeat him, puts you in a position to deliver the real blow.
This practice trains you in the principle. Merely reading it is not
enough, you must practice it.
This is a course in Fighting Jujitsu, not Competitive Jujitsu, so do
not get the idea that kicking is allowed in a Jujitsu mach. This practice
must all be done formally.
In repeated practices, the man behind knows what you are going to do
each time, and it is an easy matter for him to prevent you by tightening
his arms every time start making a move, and by dropping his body with
you every time you drop.
This is a useless way to practice. The man who takes the role of Assailant
must reproduce the conditions of an actual fight in which you would execute
your defense before Assailant had time to change his tactics.
Repeated practice will make you quick enough to knock a man out before
he grips with his full strength.
Practicing this trick will develop your reflex action until you have
a hair-trigger mind.
LESSON 13
This lesson teaches you --
How to make the elbow blow to the neck when seized from behind below
the arms.
It gives you further experience in keeping your balance, and in becoming
expert with the elbow blow.
| |
Name of Partner |
Date Commenced |
Elbow blow to the neck when seized from behind
below arms |
| 1. |
|
|
|
| 2. |
|
|
|
| 3. |
|
|
|
| 4. |
|
|
|
| 5. |
|
|
|
| 6. |
|
|
|
| 7. |
|
|
|
| 8. |
|
|
|
| 9. |
|
|
|
| 10. |
|
|
|
Make a check mark against each trick each day you practice it.
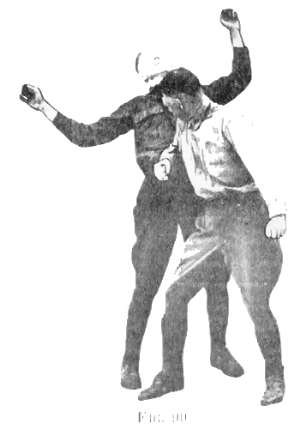
DEFENCE WHEN SEIZED BELOW ARMS FROM BEHIND
"ONE"
When an Assailant seizes you around your waist from behind, passing
his arms beneath your arms, you cannot strike him in the solar plexus with
your elbow, his arms are in the way.

First strike him violently on the nose with the back of your head.
In practice put all your strength into this effort. Make the whole body
deliver the blow, not the neck muscles alone.
Stop the blow a few inches from his nose.
"TWO"
His head flies back and his muscles loosen, momentarily at least.

At this moment swing your right elbow round onto his neck or the point
of his jaw, making the blow come not from the arm muscles but from the
Stahara.
Turn on the balls of the feet.
"THREE"
If he ducks to the left swing to your left and give him your left elbow
on the jaw or the neck.
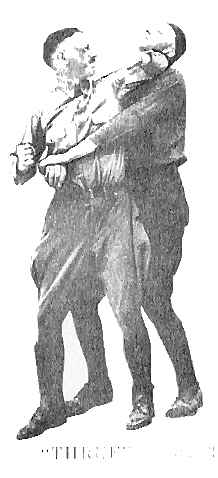
Stop the blow a couple of inches from the target but put all your force
into it.
As he staggers back repeat the blow to the abdomen, giving him the quietus.
QUICK THINKING IN MOMEMENTS OF DANGER
You hear a lot about "Quick-thinking" in moments of danger. Most of
the quick-thinking is simply the trained man's subconscious acting as it
has been trained to do by long practice.
This course will train you in this way. You will begin to realize this
when you instinctively give the elbow blow to the solar plexus when seized
above the arms and to the neck when seized below the arms.
Merely reading this course will not train you to readiness of action
but practice of these two tricks will.
WHEN ATTACKED BY A RUSH FROM BEHIND
The elbow blow has a far wider field of application than the two examples
given here.
The best way to deal with a rush from a footpad who attacks you suddenly
from some dark alley, at night, is the elbow blow.
The way to acquire an ability to use it in any emergency is to practice
these two tricks till it becomes second nature to use your body in the
correct manner.
COUNT AUDIBLY AS YOU PRACTICE
| "TAKE HOLD" |
Assailant seizes you. |
| "ONE" |
Simulate butting him on the nose. (Your partner
must loosen his grip and let his head go back.) |
| "TWO" |
Swing your right elbow to his neck. |
| "THREE" |
Swing your left elbow to his neck. |
Do this three times each, acting as Assailant alternately.
LESSON 14
THE BACK THROW
This lesson teaches you the back throw, an alternate method of escape
and defense when seized around waist from behind below arms.
Each method should be practiced to the point of efficiency where you
are able to achieve victory by that one trick alone, but in a real fight.
The victory often depends upon the number of attempts you make and the
variety of methods you employ.
You should maneuver so quickly that your opponent has not time to change
his front to meet your fresh attack.
| |
Name of Partner |
Date Commenced |
The Back Throw |
| 1. |
|
|
|
| 2. |
|
|
|
| 3. |
|
|
|
| 4. |
|
|
|
| 5. |
|
|
|
| 6. |
|
|
|
| 7. |
|
|
|
| 8. |
|
|
|
| 9. |
|
|
|
| 10. |
|
|
|
Make a check mark against each trick each day you practice it.
"TAKE HOLD"
Assailant seizes you around the waist from behind, below your arms.
"ONE"
Stamp hard on his instep with your heel. This will loosen his grip.
"TWO"
With your right hand seize the front of his right trousers-leg.
Shove with your right hand, twist your left hip forward, swinging on
balls of feet, and making effort from Stahara.
"THREE"
With left hand strike Assailant a vigorous blow below the belt.
This should be sufficient to lay him out.
Stop the blow three inches from the mark.
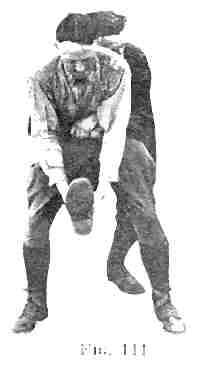
"FOUR"
With your right foot, step behind opponent. Get well down so that your
hips are beneath his thighs.
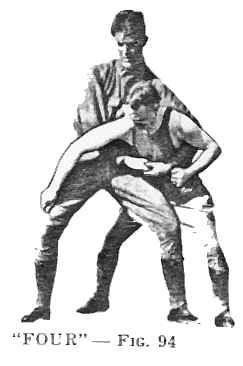
With the front of your right thigh, knock his left hip up at the same
time your right arm knocks his body backward.
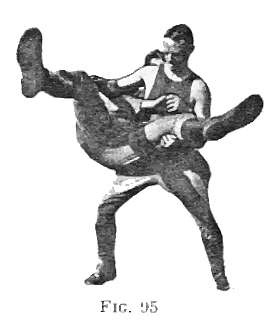
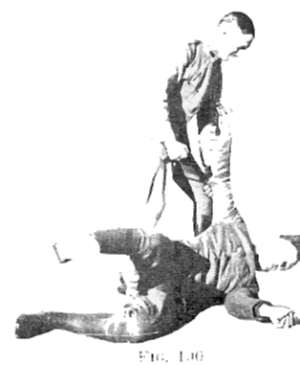
It will be sufficient to practice lifting opponent into position of
Figure 95.
Do not try this trick on a slippery floor with a heavy partner, or you
may both fall and be injured.
In practice lift him and hold him for a few seconds. This develops your
strength and teaches you to keep your balance.
In a real fight you would throw him with a backward sweep of your right
elbow.
The punch in the stomach would make him let go, but supposing it did
not, you would fall on him and knock him out.
The ability to do this can be developed without either of you having
to fall.
| "TAKE HOLD" |
Assailant seizes you. |
| "ONE" |
Simulate the kick to his instep. |
| "TWO" |
Seize his pants and twist your left hip forward. |
| "THREE" |
Simulate the punch to his stomach. |
| "FOUR" |
Step behind and lift him. |
Practice this trick three times each alternately.
In Figure 94, be sure that the forward knock your hips give him is at
right angles to his line of support, i.e., a line drawn between his heels.
This will unbalance him and make it easy to lift him. If your effort
is made parallel to his line of support you cannot unbalance him and you
are working against his strongest point.
If you find this principle difficult to understand do not lose time
over it just now, it is not very necessary for this course and will be
explained fully in the Second Course.
LESSON 15
THE SHOULDER THROW
This lesson teaches you a scientific method of throwing an Assailant
over your shoulder when he seizes you around the neck, or around the arms,
from behind.
You seize the sleeve of your opponent, unbalance him, place your center
of gravity below his, and throw him, instead of the old-fashioned method
of reaching for his head and throwing him by main strength.
| |
Name of Partner |
Date Commenced |
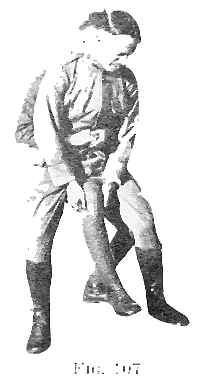
Slipping down, Fig. 97 |
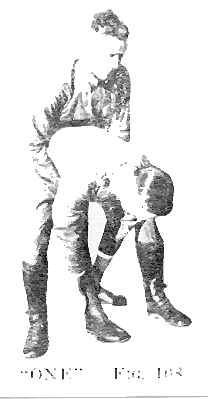
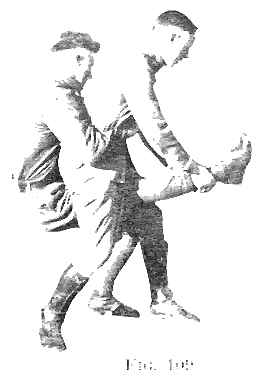
Lifting, Figs. 98, 99 |
The Shoulder Throw |
| 1. |
|
|
|
|
|
| 2. |
|
|
|
|
|
| 3. |
|
|
|
|
|
| 4. |
|
|
|
|
|
| 5. |
|
|
|
|
|
| 6. |
|
|
|
|
|
| 7. |
|
|
|
|
|
| 8. |
|
|
|
|
|
| 9. |
|
|
|
|
|
| 10. |
|
|
|
|
|
Make a check mark against each trick each day you practice it.
"TAKE HOLD"
Assailant seizes you around waist, from behind, above arms.
(When taking the role of Assailant, do not hold too tightly at first,
and do not complicate matters, or prevent his mastering the trick by dropping
down when he drops.)
Throw your right leg outside and behind his right leg, placing your
toes on the ground, and keeping your leg close to his.
Slip down through his arms, raising your arms sidewards.
Turn your body slightly to the right. Grasp the upper part of his sleeve
with both hands. Pull his armpit over your shoulder, thus unbalancing him.
Always grasp opponent's sleeve instead of his elbow or wrist. This gives
you tremendous leverage.
(Every part of your body must be limber except the Stahara, which should
be strong and balanced. At first you will be exactly the opposite, your
arms will be all tensed and your Stahara will be relaxed.)
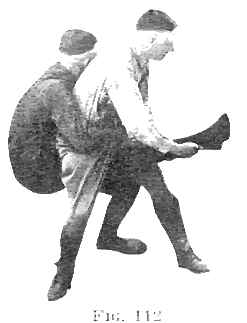
Straighten your right leg raising your hip, bend slightly forward, and
you will easily lift him.
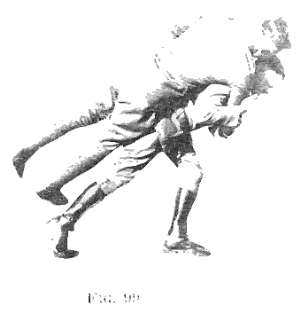
(Practice lifting him before a mirror, taking the position of Figures
98 and 99 alternately, counting "ONE" -- "TWO", until you get the knack
of lifting him by the roll of your body, not by arm or leg strength.)
Slowly rotate your right side close to the ground, rolling him gently
off your back. Keep your balance in your Stahara so that you do not fall.
Hold on to his sleeve to prevent his falling heavily. Practice on a
mat or grass.
We have some wonderful photos of a man's feet flying through the air
straight above the opponent's head. But if these illustrations were used
here the trick would look too difficult and you would not see how it was
done.
Also if you tried to do it so at first you might hurt one another.
By practicing the positions of the photos shown here you will quickly
master the trick and will be able then to throw your opponent's heels as
high as you wish.
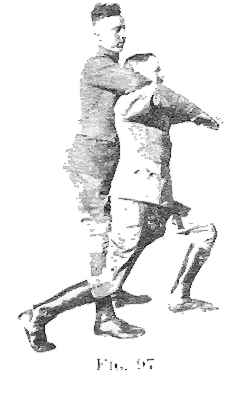
WRIGGLING OUT OF A MAN'S GRIP (Note re Figure 97)
There is quite an art in wriggling out of a man's grip. If you try to
force his arms up with the strength of your arms you will fail unless you
are much stronger than he is.
Slip down through his arms, making the effort from the Stahara, just
as if the Stahara were a corkscrew, and your shoulders were the cork.
Do not bend forward, do not force his arms up with your arms, but raise
your arms as his grip slackens.
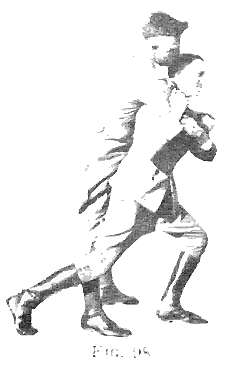
KEEP THE STRENGTH IN YOUR STAHARA (Note re Figure
98)
Take the position of the right hand man in Figure 98. Tense your leg
and arm muscles only, leaving the Stahara limp. Tell opponent to lift his
feet off the ground and attempt to support him in that position. If he
is a heavier man than you, you will probably collapse.
Again take the same position, make the Stahara strong (not by tensing
the superficial abdominal muscles, but using your body as this course has
trained you to do). You will now find that you can easily bear his weight
and that you have considerable reserve power.
The two positions illustrated in Figures 97 and 98 are shown and explained
separately in order that you may more quickly master these two points.
As a matter of fact there are not two movements here, the Jujitsu man
instantly goes from Figure 96 to Figure 98 and you would not see him in
position of Figure 97.
| "TAKE HOLD" |
|
| "ONE" |
Simulate the kick to Assailant's shins. |
| "TWO" |
Slip down and seize his sleeve. |
| "THREE" |
Throw him. |
LESSON 16
REAR STRANGLE
This is one of the most important lessons in the course.
It teaches a deadly counter to the shoulder throw.
It shows you a safe method of practicing this deadly hold until you
are perfect in it.
This lesson teaches more than just a defense. It teaches a hold that can
be used in countless situations either of offence or defense.
| |
Name of Partner |
Date Commenced |
The Rear Strangle |
| 1. |
|
|
|
| 2. |
|
|
|
| 3. |
|
|
|
| 4. |
|
|
|
| 5. |
|
|
|
| 6. |
|
|
|
| 7. |
|
|
|
| 8. |
|
|
|
| 9. |
|
|
|
| 10. |
|
|
|
Make a check mark against each trick each day you practice it.
COUNTER TO SHOULDER THROW -- THE REAR STRANGLE
As opponent slips down to take shoulder-throw position, bring the sharp
wrist-bone of your right arm against the front of his neck.
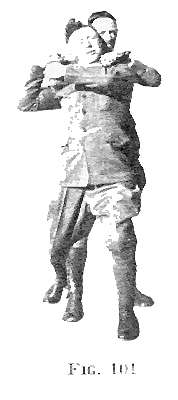
Counter to Shoulder Throw -- The Rear Strangle
With the strength of both arms, press the wrist-bone on his throat,
your chest meanwhile pressing against the back of his neck.
This is a very severe grip and can render a man unconscious instantaneously.
Do it slowly at first so that there is no danger of injury. Let both
of you "feel it out" first, the one on whom it is tried making no resistance.
OPPONENT GIVING SIGNAL OF DEFEAT (Showing clearly
the action of the wrist-bone)
In practice exert only sufficient pressure to force opponent to give
the signal of defeat.
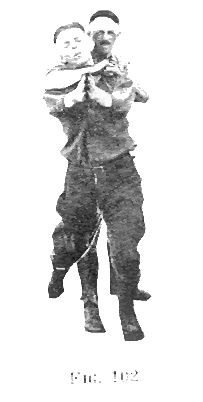
Opponent Giving Signal of Defeat (showing clearly the action of the
wrist-bone)
Practice it on each other unresistingly, playing the game of "Tickle
my nose." This will make you so expert that you can force one another to
quit without injury, and at the same time you will have such a margin of
reserve force that in a real fight you could make your opponent unconscious.
The secret of this hold is use the sharp wrist-bone on his throat, and
press the neck forward with your chest.
Practice the stranglehold in the following manner:
| "TAKE HOLD" |
Seize your opponent around the waist, from behind,
above the arms. |
| "ONE" |
Opponent simulates kick to your shins. |
| "TWO" |
He drops down and seizes your sleeve, you bring
your forearm against his throat. |
| "THREE" |
He makes no effort to throw you, and you slowly
choke him. |
Do not try to choke him by arm strength alone, but keep your strength
and balance in your Stahara. Practice till you can make him quit instantaneously
yet so gently that you do not hurt his throat.
Do this for several days before you try the Advanced Practice.
ADVANCED PRACTICE
Execute "TAKE HOLD" -- "ONE" -- "TWO" as above, then instead of saying
"THREE" say "GO" when your opponent will try to throw you with the shoulder
throw before you are able to choke him.
You will try to choke him before he can throw you.
Practice this alternately on each other, and it will increase your efficiency
with both the shoulder throw and the strangle hold.
Do not go in for violent practice, but try it again and again for the
purpose of improving your style.
The man who is doing the shoulder throw must not utilize the "Escape
from strangle hold" taught in Lesson 17. That is practiced separately.
LESSON 17
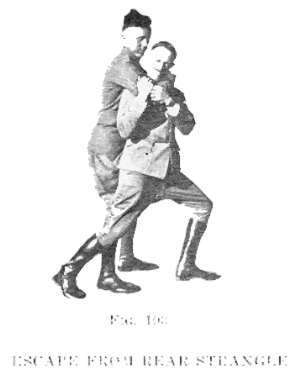
ESCAPE FROM REAR STRANGLE
This is a very important lesson.
It teaches the escape from the rear strangle.
It enables you to throw over your head anyone who attempts to strangle
you from the rear.
It will make you doubly expert at the shoulder throw.
| |
Name of Partner |
Date Commenced |
Escape from Rear Strangle |
| 1. |
|
|
|
| 2. |
|
|
|
| 3. |
|
|
|
| 4. |
|
|
|
| 5. |
|
|
|
| 6. |
|
|
|
| 7. |
|
|
|
| 8. |
|
|
|
| 9. |
|
|
|
| 10. |
|
|
|
Make a check mark against each trick each day you practice it.
ESCAPE FROM REAR STRANGLE
As opponent slowly commences to put pressure on your throat, tug his
sleeve violently forward with both hands, thus lessening the pressure on
your windpipe.
Simultaneously turn your chin into the crook of his elbow. This exposes
the large neck muscles to his attack and gives you ample time to complete
the escape and throw him; whereas if you allow the pressure to continue
on your windpipe one second is enough to make you quit.
Perform this slowly in an experimental spirit, not in a spirit of competition
between you and your partner. Do this once or twice in front of a mirror
and compare your position with the photos.
Keep your balance in your Stahara so that neither requires to support
himself by clinging to his opponent.
EXPERT PRACTICE IN SHOULDER THROW
The moment you escape from the strangle hold you must throw opponent.
If you remain where you are after escaping and simply try to hold his
forearm off your neck, your assailant is in the strategic position and
can hold you and perhaps finally choke you.
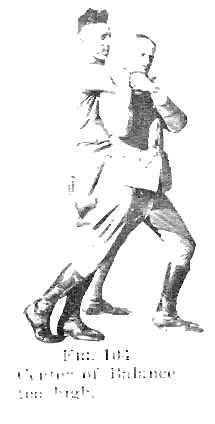
If you attempt to throw him from such a position as Figure 104 you will
not succeed unless you are disproportionately stronger than he is, as your
center of balance is too high.
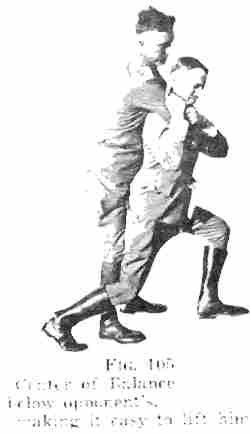
Drop your Stahara down, slipping your right foot slightly to the rear,
thus bringing your center of gravity below his; then the principle of applied
mechanics will make it easy for you to throw him.
In practice be careful however to lower him gently to the ground.
HINTS ON PRACTICE
The following method is the best way to become expert as it centers
all your practice at the crucial point where opponent is all set and ready
to choke you.
It also makes the practice of this dangerous hold perfectly safe.
| "TAKE HOLD" |
Assailant seizes you around the waist from behind,
above the arms. |
| "ONE" |
Simulate a kick to his shins. |
| "TWO" |
Slip down through his arms and seize his sleeve
with both hands. |
| "THREE" |
Opponent tries to choke you, execute the escape
and throw him |
THE KICK is retained in all three foregoing tricks ("The Shoulder Throw"
-- "The Strangle" -- "The Escape"), in order to make the counting in each
trick the same. This gives you less to think about when practicing.
When revising the lessons, practice each one separately. When practicing
the shoulder throw, Lesson 15, opponent must not complicate matters by
countering with the strangle hold.
When practicing the stranglehold, Lesson 16, opponent must not counter
with the escape.
When practicing the escape from the strangle hold, Lesson 17, opponent
must not counter with the deathlock (Book 7). After learning the deathlock,
make it the fourth trick in this series, as a counter to a counter-counter.
The third trick in the series teaches you how to escape from any strangle
which is done by strength of arms alone. The deathlock chokes you with
the strength of the whole body and unbalances you while doing so, and from
it there is no escape.
LESSON 18
This lesson teaches you: --
THE ANKLE THROW
Giving you further versatility in dealing with an attack from behind,
and a further education in the correct use of your body, and in unbalancing
Assailant.
| |
Name of Partner |
Date Commenced |
Ankle Throw |
| 1. |
|
|
|
| 2. |
|
|
|
| 3. |
|
|
|
| 4. |
|
|
|
| 5. |
|
|
|
| 6. |
|
|
|
| 7. |
|
|
|
| 8. |
|
|
|
| 9. |
|
|
|
| 10. |
|
|
|
Make a check mark against each trick each day you practice it.
THE ANKLE THROW
"TAKE HOLD"
Assailant grasps you around the waist from behind, below the arms, with
his right foot between your legs. In this position he is well braced and
is not so open to the previous methods of escape.
The usual counter is to grasp his knee, lift it up, and throw him if
you are able.
This does not give half the leverage the following method does.
"ONE"
Lean well forward and grasp his ankle. Even if he is holding tightly
make the effort from the Stahara and you will reach down.
It may be necessary sometimes to make a feint for another trick which
he would defend by paying attention to another part of his body. You can
then deliberately bend forward and pick up his ankle.
Do not try to pull his leg up by the arms only.
Stand up, making the effort from the Stahara and you will have twice
the power.
Practice this slowly otherwise you will bang his head on the ground
and thus summarily end the practice for the day.
In practice the Assailant must let go when he feels himself falling
and so land gently on the mat.
In a real fight, if he holds on, fall on him and that will knock him
out.
ADVANCED PRACTICE IN THE ANKLE THROW
When trying to throw Assailant by the ankle throw, if he retains his
balance and hops around on his left leg it will be impossible to throw
him by a straight pull forward.
Swing his foot away round to your left. This will unbalance him and
you will throw him without any trouble.
Do not put your full force into the swing.
Have your Assailant let go as he falls. This will save him from your
falling on top of him.
You will become expert in these tricks more quickly if you practice
in this prescribed formal manner than if you make a wrestling match out
of each trick.
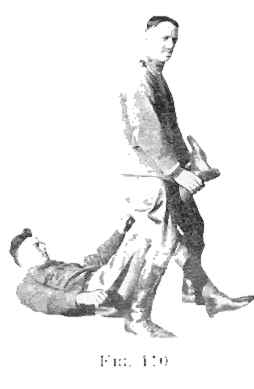
WARNING
If Assailant does not let go you would fall on him like this and knock
him out.
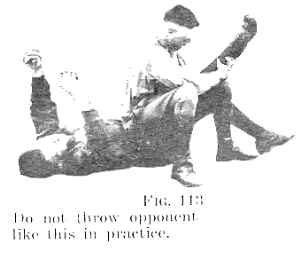
It is a very dangerous fall so avoid it by practicing formally.
You can become quite expert by formal practice.
Also pick up Assailant's left foot. Get him to hop around on his right
retaining his balance.
Throw him by swinging to your right.
Practice this with each foot alternately until you no longer hesitate
about the correct direction in which to swing him.