Journal
of Non-lethal Combatives, Sept 2000
The Secrets of Jujitsu, A Complete Course in Self
Defense, Book III
By Captain Allan Corstorphin Smith, U.S.A.
Winner of the Black Belt, Japan, 1916. Instructor of Hand-to-Hand Fighting,
THE INFANTRY SCHOOL, Camp Benning, Columbus, Georgia and at United States
Training Camps and Cantonments, 1917 and 1918.
In Seven Books.
BOOK THREE.
STAHARA PUBLISHING COMPANY
Columbus, Georgia, 1920.
***
This electronic version is copyright EJMAS © 2000. All rights
reserved.
Contributed by Thomas J. Militello, a 15-year member of Astoria,
New York's non-profit Horangi Taekwondo Dojang, which is headed by James
Robison.
Readers interested in seeing film images should note the following
film held by the National Archives and Record Administration:
NWDNM(m)-111-H-1180.
Title: Physical and Bayonet Training, 1918.
Scope and Content: Recruits at Camp Gordon, Georgia receive detailed
instruction in boxing and jiu-jitsu. Wrestling and jiu-jitsu holds are
used against a foe with a bayonet. Troops do calisthenics and play rough
games calculated to make them physically fit.
35mm film, 15 minutes
Judging from responses from the US Army historians at Forts Myer
and Benning, little biographical information is available concerning Captain
Smith. Therefore readers with additional information are requested to contact
the editor at jrsvinth@juno.com.
LESSON 9
This lesson teaches you --
-
First preliminary wrist exercise.
-
Second preliminary wrist exercise.
-
First wrist escape.
-
Second wrist escape (Book I).
-
Wrist escape and edge of hand blow.
| |
Name of Partner |
Date Practice Commenced |
No. 1 |
No. 2 |
No. 3 |
No. 4 |
No. 5 |
| 1. |
|
|
|
|
|
|
|
| 2. |
|
|
|
|
|
|
|
| 3. |
|
|
|
|
|
|
|
| 4. |
|
|
|
|
|
|
|
| 5. |
|
|
|
|
|
|
|
| 6. |
|
|
|
|
|
|
|
| 7. |
|
|
|
|
|
|
|
| 8. |
|
|
|
|
|
|
|
| 9. |
|
|
|
|
|
|
|
| 10. |
|
|
|
|
|
|
|
Make a check mark against each trick each day you practice it.
PRELIMINARY WRIST EXERCISE
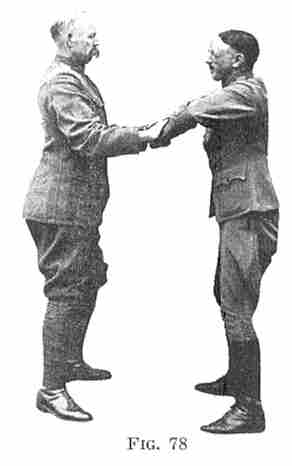
Assailant seizes your right wrist with his left hand, as in fig. 58,
his thumbs above and his fingers below.
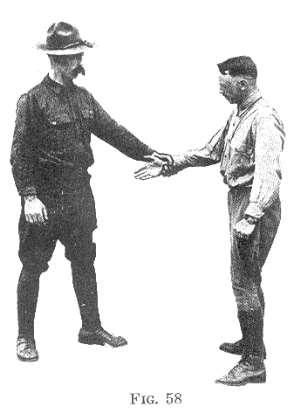
Turn your forearm so that the thin edge of your wrist (the thumb edge)
faces the opening between his thumb and first finger.
This opening is the weakest point in his grip.
Whip your wrist straight out of this opening.
Practice first with a pause between turning your wrist and whipping
it out. Then practice it as one movement.
(In the "FIRST WRIST ESCAPE," if you find yourself trying to force the
broad part of your wrist out of his grip, you should return and practice
this first exercise until the proper twist of the wrist comes automatically.)
SECOND PRELIMINARY EXERCISE
Lever your wrist out of his hand by pushing your elbow round to his
elbow using the edge of his hand as a fulcrum.
Swing the right side of your body towards him, pivoting on the ball
of the right foot, making the effort from the Stahara.
The weakest man's Stahara is stronger than the strongest man's wrist.
This lesson further teaches you to play the strength of your Stahara against
his wrist.
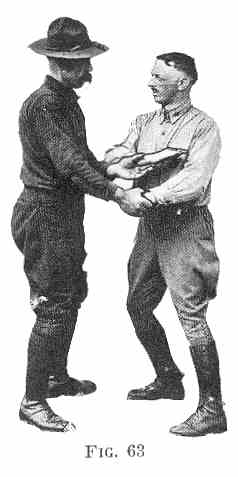
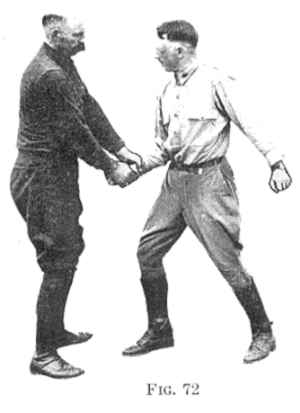
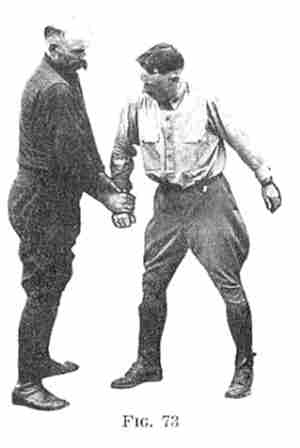
FIRST WRIST ESCAPE
Assailant seizes your right wrist in his left hand and your left wrist
in his right hand.

Release your right wrist exactly as described in second preliminary
exercise.
The power of the Stahara can be used just as much in this trick as in
the upward wrist escape in Book 1.
If a strong man holds your wrists too tightly when you first try this,
you will forget all about the Stahara and will only use arm strength, therefore
practice it at first with your wrists held lightly.
Release left wrist in the same manner, swinging on the balls of the
feet, making the effort from the Stahara.
Keep the body erect and straight and the elbow in at the side.
Practice until you get the knack.
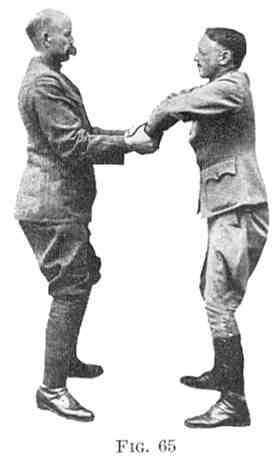
WRONG METHOD
Fig. 65 shows how not to do it. By raising your elbow this way
you are using arm strength instead of Stahara strength.
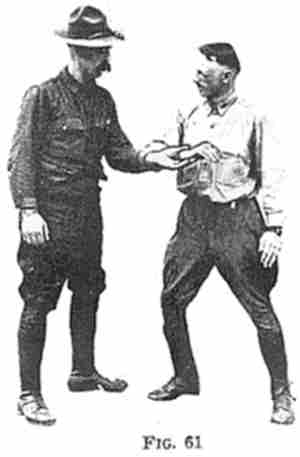
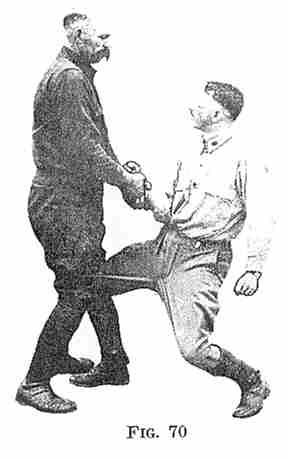
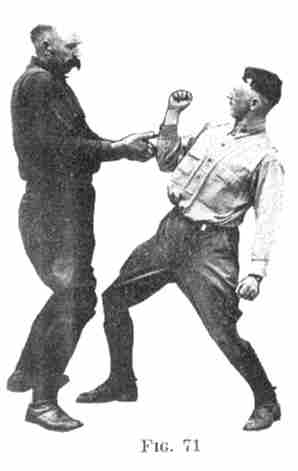
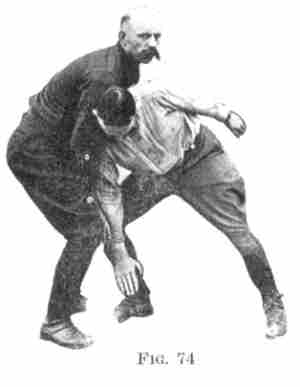
WRIST ESCAPE AND EDGE OF HAND BLOW
Assailant seizes your left elbow with his right hand and your right
wrist with his left hand.
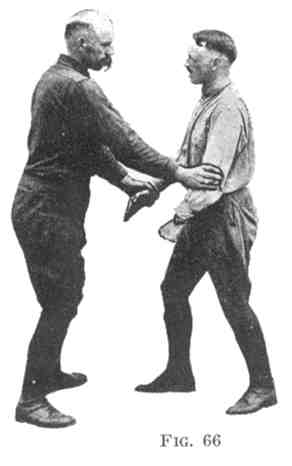
Let him shove you slowly back.
You will find it difficult to free your elbow.
But you will have no difficulty in whipping your right wrist away as
already taught doing it with a turn of the body.
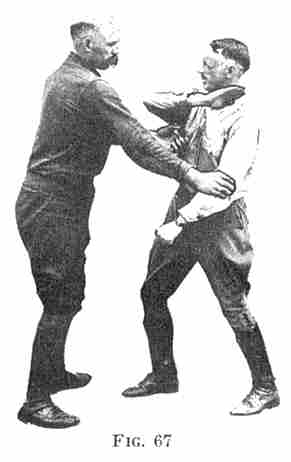
With the same motion that frees your hand carry it to the height of
Assailant's shoulder.
Strike a straight chopping blow with the edge of the right hand at Assailant's
neck.
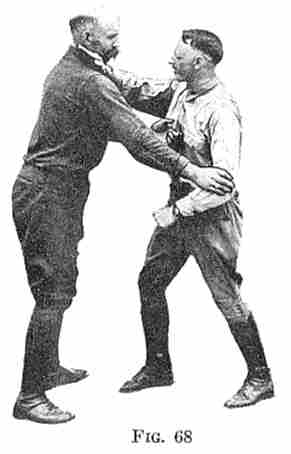
In practice put strength into the blow but stop it a few inches from
his neck. With this blow it is an easy matter to knock a man out.
Also practice it with Assailant seizing your right elbow and left wrist.
When done with the proper turn of the body, that is, with the strength
of the Stahara instead of strength of arm, you will find it an easy matter
to slip your wrist out of a much stronger man's grasp.
At first you may be clumsy and in carrying your right hand your right
hand up to your left shoulder you may strike it against his right arm.
With a little practice, however, you will execute the trick with neatness
and dispatch.
This, and the other wrist tricks, train you to work with neatness and
dispatch, and apart from their value as fighting tricks play an important
part in educating your body.
These wrist escapes are very hard on the skin so mutually agree to hold
one another's wrists lightly until the correct movement of the body is
mastered. You can learn quite as effectively if the wrists are held lightly.
Ladies might be advised to wear old gloves to protect their wrists.
Practice until you can escape from a fairly strong grip, without effort,
by the weight and swing of the body.
Try to get the weight of your Stahara into the first wrist escape to
the same extent that you did in the upward wrist escape, Book I.
At first direct your attention towards training your own body, disregarding
your opponent, in which object your opponent will assist by remaining stationary,
and so simplifying your task.
After your body has acquired the correct motion begin to watch Assailant's
body, he may then try to prevent your escape.
You can make him relax slightly by taking away his attention, by some
remark, or by pretending to kick him, or in a fight by actually kicking,
say, his shins, then escape when his grip momentarily weakens.
You now know two simple wrist escapes -- the first wrist escape of this
lesson, and the upward (second) wrist escape of Book I. If your Assailant
frustrates your attempt to get away with one, you can instantly try the
other, and escape.
Even if the effort to escape tears your skin you can still lever your
wrists out of a powerful grip, but if you go tearing one another's skin
at the start it will interfere with your practice.
LESSON 10
This lesson teaches you: --
-
The upward single wrist escape.
-
The downward single wrist escape.
| |
Name of Partner |
Date Commenced |
Upward Wrist Escape |
Downward Wrist Escape |
| 1. |
|
|
|
|
| 2. |
|
|
|
|
| 3. |
|
|
|
|
| 4. |
|
|
|
|
| 5. |
|
|
|
|
| 6. |
|
|
|
|
| 7. |
|
|
|
|
| 8. |
|
|
|
|
| 9. |
|
|
|
|
| 10. |
|
|
|
|
Make a check mark against each trick each day you practice it.
UPWARD SINGLE WRIST ESCAPE
Assailant seizes your right wrist with both his hands, with his thumbs
above and his fingers below.
Step forward and drop down exactly as described in Book 1, so that your
elbow is below his hands and bent in an acute angle with the Stahara behind.
With the weight of your body, force your wrist up and out of his grasp.
Besides being a valuable wrist trick, it trains you to put the weight
of your body into any given movement. Always work with the strength of
your body against the strength of Assailant's arms, getting him off balance
while doing so.
After a little practice you will execute this trick so swiftly that
you make the downward and upward movement before he has time to prevent
you getting your elbow below his wrists.
DOWNWARD SINGLE WRIST ESCAPE
Assailant seizes your right wrist with both his hands.
He twists his hands around until the palms (instead of just his thumbs)
are above your wrist.
This makes the previous mode of escape impossible.
With a turn of the body bring your elbow perpendicularly over your fist.
With the weight of your body, force your hand down through his fingers.
Push him off balance with your shoulder and his grip will still further
weaken.
You may make a feint as if going to try to force your wrist up as in
the previous trick and then suddenly change your tactics, bring your elbow
above your fist instead of beneath it.
The two tricks taught in Lesson 10 train your ability further to play
the strength of your body against the strength of Assailant's arms: to
use your balance against his balance.
Every fresh step you make along these lines makes it easier to apply
these principles in all other tricks.
Do not make the mistake of thinking that some of these lessons or tricks
are superfluous or uninteresting.
A great many simple tricks are given here for the purpose of teaching
you anatomy, not the anatomy of the college textbook which teaches you
to name each part of your body, but the practical anatomy of the jujutsu
man who knows what part of his opponent's body to seize, and how to use
each part of his own body to the greatest advantage.
LESSON 11
This lesson teaches you: --
-
Escape when Assailant seizes you with the under grip.
-
How to reinforce the grip of the hands with the strength of the Stahara.
-
Escape when held with such a grip.
In Lessons 9 and 10, Assailants were above your wrists. In this
lesson his thumbs are below your wrists.
| |
Name of Partner |
Date Commenced |
No. 1 |
No. 2 |
No. 3 |
| 1. |
|
|
|
|
|
| 2. |
|
|
|
|
|
| 3. |
|
|
|
|
|
| 4. |
|
|
|
|
|
| 5. |
|
|
|
|
|
| 6. |
|
|
|
|
|
| 7. |
|
|
|
|
|
| 8. |
|
|
|
|
|
| 9. |
|
|
|
|
|
| 10. |
|
|
|
|
|
Make a check mark against each trick each day you practice it.
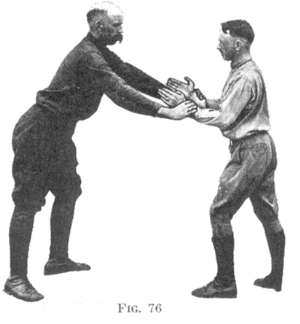
UNDERHAND GRIP -- DOWNWARD ESCAPE, BOTH WRISTS
Assailant seizes your wrists with his thumbs beneath your wrists. (In
the previous tricks his thumbs were above your wrists.)
Keep your wrists straight, use the sharp bone of wrist as a knife.
Come straight down on second knuckle joint of Assailant's thumb as if
trying to cut it out.
Step back with one foot as you pull and cut. Draw your elbows down and
in to your side. Keep your body erect and make the effort from the Stahara.
The first part of the escape comes from the weight of your body pulling
your opponent off balance. The finishing part is the cut of the
hands.
These are done simultaneously after the trick is mastered, but you will
acquire the knack more quickly if you try to distinguish these two factors
in your first practice.
WRONG METHOD
The wrong method is to hold the elbows away from the sides and try to
escape by the strength of your arms.
(It is easy to dislocate a man's thumbs by vigorously doing this trick
so in practice hold each other lightly. In this way you will save your
thumbs and so be able to practice more.)
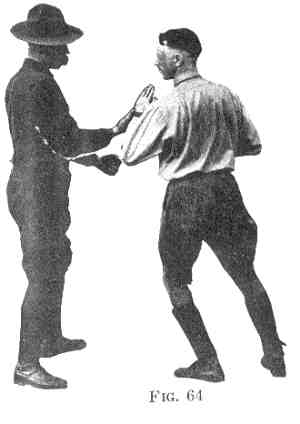
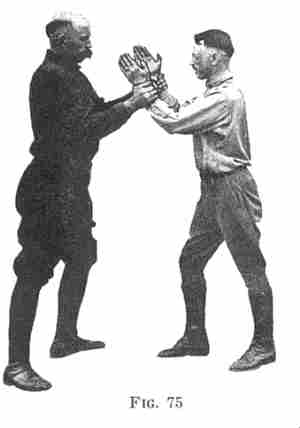
DOWNWARD ESCAPE -- CONTINUED
Seize opponent's wrists. Hold the heel of your hand beneath his wrists
so that when he tries to cut down he is cutting against your palms instead
of against your thumbs.
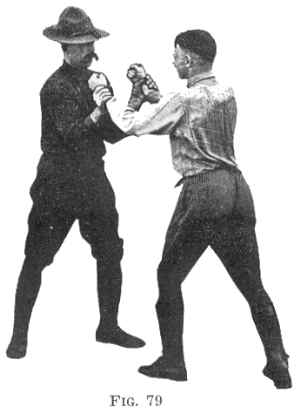
Reinforce the strength of hands by holding your forearms perpendicular,
elbows resting on your Stahara, like the man on the left in figure 79.
In this way you can hold him indefinitely.
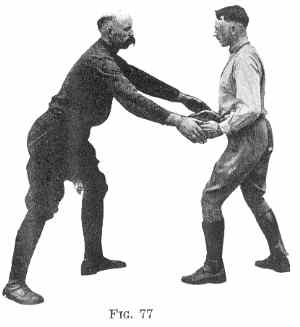
Now, if you are seized in this manner, bring your wrists nearer each
other until they almost touch.
Your sharp wrist bones are now directly above the second joint of his
thumbs (instead of above his palms), and you can cut down as previously
described.
Step back in such a manner that the mere strength of his grip on your
wrists brings him on his tiptoes, thus unbalancing him. Then cut down and
escape.
By unbalancing an opponent, you make him unable to bring more than 20%
of his strength to bear.
By keeping your own balance (by paying attention to your Stahara), you
can bring 100% of your strength to bear on him.
SUMMARY
Thus described these movements are absurdly simple. It is by studying
each trick in its simplest component parts that you can master it without
a teacher.
These photos show a great deal more than merely how to escape from a
wristhold.
The first series shows how to play the strength of the body against
the effort of his wrists.
The second shows how to sidestep, as it were, that strength.
The third shows how to use his own strength to unbalance him.
We are using these simple methods to train your body in the Stahara
method.
A man seizes your wrists in one of two ways, his thumb is either above
your wrist, or else his thumb is below your wrist.
Practice Lessons 9 and 10 until you no longer hesitate about applying
the proper escape when your wrists are seized with Assailant's thumb above.
Then practice Lesson 11 until you act without hesitation, with the correct
escape, when Assailant's thumb above.
You will then never be confused, no matter how your wrists are seized.
A man might seize one of your wrists with one thumb down and your other
wrist with his thumb up. Do not pay any attention to these variations until
you have mastered the fundamental methods given here. You will then be
able to take care of all the variations.
***
These lessons are built with a view to the cumulative effect on your
manner of handling yourself. You will do all the other lessons better after
you have studied Book 3, and will do Book 3 better after you have studied
the others.
***
There are numerous other ways of escaping from wrist holds, but the
object of this course has been not to dazzle the eye by an infinite variety
of tricks, but to train you to do some essential tricks with the real
knack of a jujitsu man, by using the other fellow's strength against
him, and by reinforcing the strength of your limbs by the strength of your
Stahara.
For this purpose you are made to do certain movements while Assailant
is holding you in various ways, and the sum total of the experience you
get will be that you begin to use your body properly.